Mechanic for C5 - based near London

VantaR

Well-known user
Hi all,

I hope everyone is having a wonderful week ahead of our sandwiched bank holiday days. I have a new paranoia!

the plastic bushings in my automatic c5's shift cable have never been replaced, I've heard they can give up the ghost without warning and strand you, so wondered if it would be advisable if I switch them right now? If so, I'm worried I'll mess it up if I try do it myself - can anybody recommend a mechanic not too far from West London?

I have used TopCats previously and they were brilliant, just a bit far. - I need a few other bits addressed too (handbrake cables)

I've heard of Ian Goss? Thanks in advance.
 

VantaR

Well-known user
Ian Goss you mention, they are in Surbiton or Surrey Lodge Motors at Wraysbury (1/2 mile from junction 13 of M25)
Okay excellent, been trying to find an email for them. No answer to phone calls just yet. Surbiton is reasonably close.

Any chance you have an email for them? Thanks for your help.
 

scazman

Regular user
Hi. If you're on Facebook, then send Ian a message via his F/B page messenger (IGSAmerican). He's normally really good at replying.
Oh and I'm another VERY satisfied, long standing IGS customer...!
 

VantaR

Well-known user
Hi. If you're on Facebook, then send Ian a message via his F/B page messenger (IGSAmerican). He's normally really good at replying.
Oh and I'm another VERY satisfied, long standing IGS customer...!
For Surrey Lodge, you will need to email through this link
Thanks both,

Spoke to Ian at IGS, unfortunately he is busy with work until the foreseeable future so no luck. I have reached out to Surrey Lodge.

Failing both and trying to keep to within a reasonable travel distance to West London, where else would you recommend? All I need is the plastic bushings on the shift cables replaced.
 

teamzr1

Supporting vendor
You need to in more detail as what you're trying to replace as the shift cable ends have the bushings part of the cable

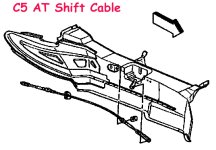
Print this out


C5ATshiftcable.jpg

Here is how GM service manual states to remove and replace the cable​

Shift Cable: Service and Repair​

Removal Procedure

1. Raise and suitably support the vehicle. Refer to Vehicle Lifting.
2. Shift the floor shift control to NEUTRAL.
If replacing a damaged cable, be sure that BOTH the floor shift control and the transmission are in NEUTRAL.
3. Remove the intermediate exhaust pipe. Refer to Intermediate Pipe Replacement in Exhaust System.
4. Remove the driveline tunnel close out panel. Refer to Driveline Tunnel Closeout Panel Replacement.

Important: Use care to not suddenly jerk the shift control cable during disassembly, the shift control cable rod end guide tubes are EXTREMELY INFLEXIBLE and capable of only a SLIGHT bend.

5. Using a large flat bladed screwdriver, CAREFULLY release the shift control cable end clip from the floor shift control arm stud.
6. Remove the shift control cable from the driveline tunnel bracket.
6.1. Using a flat bladed screwdriver, pry the cable retaining staple clip from the cable.
6.2. Depress the cable retaining tabs.
6.3. While depressing the tabs, push the tabs through the hole in the driveline tunnel bracket.
6.4. Slide the cable out of the bracket slot.
7. Remove the nuts retaining the shift control cable bracket to the transmission.
8. Reposition the cable and cable bracket away from the studs.

Important: Use care to not suddenly jerk the shift control cable during disassembly, the shift control cable is EXTREMELY INFLEXIBLE.

9. CAREFULLY release the shift control cable end clip from the transmission shift lever stud.
10. Remove the shift control cable and bracket.
11. Remove the shift control cable bracket from the shift control cable, if necessary.
11.1. Using a flat bladed screwdriver, pry the shift cable retaining staple clip from the cable.
11.2. Depress the shift cable retaining tabs.
11.3. While depressing the tabs, push the tabs through the hole in the shift cable bracket.
11.4. Slide the cable out of the bracket slot.


Installation Procedure

1. Install the shift control cable bracket to the shift control cable, if removed.
1.1. Slide the smaller diameter portion of the cable into the slot in the shift cable bracket.
1.2. Push the tabs through the hole in the bracket to lock the cable in place.
1.3. Insert the shift cable retaining staple clip between the shift cable retaining tabs. Press the staple clip firmly to secure.

2. Position and install the shift control cable to the driveline tunnel bracket.
2.1. Slide the smaller diameter portion of the shift cable into the slot in the driveline tunnel bracket.
2.2. Push the shift cable retaining tabs through the hole in the bracket to lock the cable in place.
2.3. Insert the shift cable retaining staple clip between the shift cable retaining tabs. Press the staple clip firmly to secure.
3. Align the shift control cable end to the floor shift control arm stud.

Important: Use care to not suddenly jerk the shift control cable during assembly, the shift control cable rod end guide tubes are EXTREMELY INFLEXIBLE and capable of only a SLIGHT bend.

4. CAREFULLY secure the shift control cable end clip to the floor shift control arm stud.
5. Install the shift control cable bracket to the transmission studs.

Notice: Refer to Fastener Notice in Service Precautions.

6. Install the nuts retaining the shift control cable bracket to the transmission.
^ Tighten the transmission shift control cable bracket retaining nuts to 20 Nm (15 ft. lbs.).
7. Check to be sure that BOTH the floor shift control and the transmission are in NEUTRAL.
8. Align the shift control cable end to the transmission shift lever stud.

Important: Use care to not suddenly jerk the shift control cable during assembly, the shift control cable is EXTREMELY INFLEXIBLE.

9. CAREFULLY secure the shift control cable end clip to the transmission shift lever stud.
10. If installing a NEW transmission shift control cable, remove the shipping guard from the adjuster lock.
11. If installing a NEW transmission shift control cable, depress the shift control cable adjuster lock.
12. Lower the vehicle; leave the vehicle on the hoist.
13. Verify that the shift control cable is operating smoothly:
13.1. Firmly apply the parking brake.
13.2. Turn the ignition switch to ON; DO NOT start the engine.
13.3. Apply the regular brakes.
13.4. Shift from NEUTRAL to FIRST, then shift from FIRST to SECOND, then DRIVE and so on; pause for 1 second in each detent position. Take note of an audible sound from the transmission shift lever each time a shift detent is selected.
13.5. Shift from PARK directly to FIRST.
13.6. Repeat steps 13.4 and 13.5 an additional 2 times.
13.7. If any binding is felt during this check, or if no audible sound was produced from the transmission shift lever, inspect the shift control cable for damage (at either end of the cable).
13.8. Shift the floor shift control into PARK.
13.9. Release the regular brakes.
13.10. Turn the ignition switch OFF.
13.11. Release the parking brake.
14. Raise and support the vehicle.
15. Install the driveline tunnel closeout panel. Refer to Driveline Tunnel Closeout Pane/ Replacement.
16. Install the intermediate exhaust pipe. Refer to Intermediate Pipe Replacement in Exhaust System.
17. Test drive the vehicle in an area with little traffic; ensure that the transmission will shift smoothly into, and maintain each detent position.
 

VantaR

Well-known user
You need to in more detail as what you're trying to replace as the shift cable ends have the bushings part of the cable

Print this out


View attachment 29681

Here is how GM service manual states to remove and replace the cable​

Shift Cable: Service and Repair​

Removal Procedure

1. Raise and suitably support the vehicle. Refer to Vehicle Lifting.
2. Shift the floor shift control to NEUTRAL.
If replacing a damaged cable, be sure that BOTH the floor shift control and the transmission are in NEUTRAL.
3. Remove the intermediate exhaust pipe. Refer to Intermediate Pipe Replacement in Exhaust System.
4. Remove the driveline tunnel close out panel. Refer to Driveline Tunnel Closeout Panel Replacement.

Important: Use care to not suddenly jerk the shift control cable during disassembly, the shift control cable rod end guide tubes are EXTREMELY INFLEXIBLE and capable of only a SLIGHT bend.

5. Using a large flat bladed screwdriver, CAREFULLY release the shift control cable end clip from the floor shift control arm stud.
6. Remove the shift control cable from the driveline tunnel bracket.
6.1. Using a flat bladed screwdriver, pry the cable retaining staple clip from the cable.
6.2. Depress the cable retaining tabs.
6.3. While depressing the tabs, push the tabs through the hole in the driveline tunnel bracket.
6.4. Slide the cable out of the bracket slot.
7. Remove the nuts retaining the shift control cable bracket to the transmission.
8. Reposition the cable and cable bracket away from the studs.

Important: Use care to not suddenly jerk the shift control cable during disassembly, the shift control cable is EXTREMELY INFLEXIBLE.

9. CAREFULLY release the shift control cable end clip from the transmission shift lever stud.
10. Remove the shift control cable and bracket.
11. Remove the shift control cable bracket from the shift control cable, if necessary.
11.1. Using a flat bladed screwdriver, pry the shift cable retaining staple clip from the cable.
11.2. Depress the shift cable retaining tabs.
11.3. While depressing the tabs, push the tabs through the hole in the shift cable bracket.
11.4. Slide the cable out of the bracket slot.


Installation Procedure

1. Install the shift control cable bracket to the shift control cable, if removed.
1.1. Slide the smaller diameter portion of the cable into the slot in the shift cable bracket.
1.2. Push the tabs through the hole in the bracket to lock the cable in place.
1.3. Insert the shift cable retaining staple clip between the shift cable retaining tabs. Press the staple clip firmly to secure.

2. Position and install the shift control cable to the driveline tunnel bracket.
2.1. Slide the smaller diameter portion of the shift cable into the slot in the driveline tunnel bracket.
2.2. Push the shift cable retaining tabs through the hole in the bracket to lock the cable in place.
2.3. Insert the shift cable retaining staple clip between the shift cable retaining tabs. Press the staple clip firmly to secure.
3. Align the shift control cable end to the floor shift control arm stud.

Important: Use care to not suddenly jerk the shift control cable during assembly, the shift control cable rod end guide tubes are EXTREMELY INFLEXIBLE and capable of only a SLIGHT bend.

4. CAREFULLY secure the shift control cable end clip to the floor shift control arm stud.
5. Install the shift control cable bracket to the transmission studs.

Notice: Refer to Fastener Notice in Service Precautions.

6. Install the nuts retaining the shift control cable bracket to the transmission.
^ Tighten the transmission shift control cable bracket retaining nuts to 20 Nm (15 ft. lbs.).
7. Check to be sure that BOTH the floor shift control and the transmission are in NEUTRAL.
8. Align the shift control cable end to the transmission shift lever stud.

Important: Use care to not suddenly jerk the shift control cable during assembly, the shift control cable is EXTREMELY INFLEXIBLE.

9. CAREFULLY secure the shift control cable end clip to the transmission shift lever stud.
10. If installing a NEW transmission shift control cable, remove the shipping guard from the adjuster lock.
11. If installing a NEW transmission shift control cable, depress the shift control cable adjuster lock.
12. Lower the vehicle; leave the vehicle on the hoist.
13. Verify that the shift control cable is operating smoothly:
13.1. Firmly apply the parking brake.
13.2. Turn the ignition switch to ON; DO NOT start the engine.
13.3. Apply the regular brakes.
13.4. Shift from NEUTRAL to FIRST, then shift from FIRST to SECOND, then DRIVE and so on; pause for 1 second in each detent position. Take note of an audible sound from the transmission shift lever each time a shift detent is selected.
13.5. Shift from PARK directly to FIRST.
13.6. Repeat steps 13.4 and 13.5 an additional 2 times.
13.7. If any binding is felt during this check, or if no audible sound was produced from the transmission shift lever, inspect the shift control cable for damage (at either end of the cable).
13.8. Shift the floor shift control into PARK.
13.9. Release the regular brakes.
13.10. Turn the ignition switch OFF.
13.11. Release the parking brake.
14. Raise and support the vehicle.
15. Install the driveline tunnel closeout panel. Refer to Driveline Tunnel Closeout Pane/ Replacement.
16. Install the intermediate exhaust pipe. Refer to Intermediate Pipe Replacement in Exhaust System.
17. Test drive the vehicle in an area with little traffic; ensure that the transmission will shift smoothly into, and maintain each detent position.
Hi Yes,

Just replacing the bushings. Nothing gone wrong with them, but figure some preventative maintenance is in order as they can be a fail point.

I don't believe the whole dropping the exhaust part is necessary so long as the cable is intact. It would just be the bushings at each end (unless i am mistaken?)
 

VantaR

Well-known user

teamzr1

Supporting vendor
My understanding is the difference is one comes with ones you need and some other sizes
and other is just the one size you need
 

teamzr1

Supporting vendor
I do not know first had but what I read that others have bought to replace just the bushings front and rear
Multipack just comes with more bushings than needed
 
Top