OK Now I need Help - Putting your thinking caps on !

teamzr1

Supporting vendor
I was driving my 1993 Cadillac Sedan Deville 60 Special 1 week ago
I have owned it for 23 years and has over 273,000 miles on it

This is front week drive, engine L26 which is a 4.9L engine that fricking sits sideways, so the front of the engine is about 2 inches away
from the right front frame rail :-(
So driving it and then out of the blue barely steer this 2 ton tank, I thought a front tire went down
I had just bought food, some frozen and did not want to get stuck and have it all melt, so I tanked this for 3 miles home
Reminded me back in the 1960s when I had a 1954 Buick Roadmaster with a big block and had no power steering

Popped the hood to find the serpentine belt popped off so had no power steering alt, cooling pump or A/C
Fought getting the belt back on, started engine and belt popped off again, crap
Bought a new belt, fought getting that on and same results, had to order a new belt tensioner and when getting it and installed with new belt
Started engine and in 30 seconds hear 2 loud clunks :)

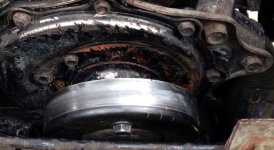
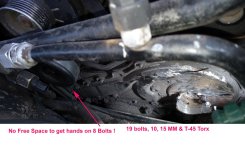
Find the shaft for the coolant pump snapped, so now the pulley is broken off but cannot get it out as the frame rail is only like 2 inches from pulley
and with the shaft still on the pulley, there is zero room to pull the pulley outward to get it and shaft out !
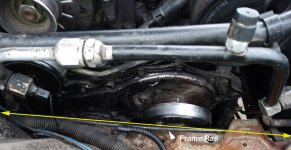
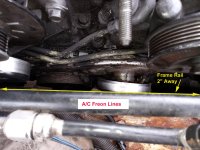
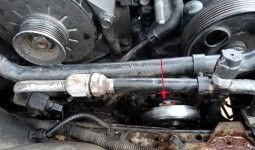
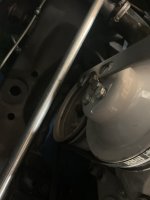
pulleyframerai2.jpgpulleyframerail.jpg

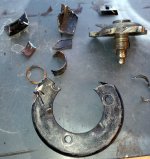
BrokenWPulley.jpg

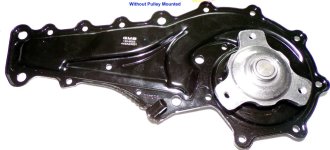
To make it worse, even though the pump itself is only 3 1/2 inches diameter it is part of the whole front cover and there are 19 bolts for that cover all
hidden and 4 of them are behind the pulley so cannot get the cover off !


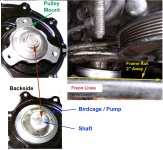
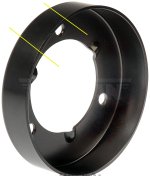
New one , see the mounting plate and shaft
I cannot get the 3 bolts off the old one as broken off, no way to hold pulley to not move while trying to break loose the 3 bolts
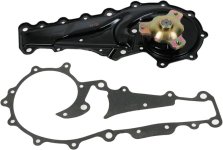
93caddywaterpump.jpg


So issue is what sneaky way you think can get to snap the steel shaft housing off the cover to get the pulley and mount off so I can than fight getting cover off ?
No, I cannot raise or lower engine with car sitting outside or torch off the shaft ?

New pumps do not come with a pulley and finding one of a car 32 years old, so I do not want to damage the existing one
OK, guys come up with a sneaky way to get the shaft housing, that also has a steel bearing case busted off !

Thanks
 

Custom exotics

Well-known user
Why can't you use a long pry bar to lock between 2 of the pulley bolts whilst u lossen 3rd then turn pulley and do next bolt and then next fallen remove once all loose
 

teamzr1

Supporting vendor
Try and break the casing and take it out in bits pray it breaks across spindle hole

Being what is pressed on the cover is the case of pump bearings, it is hard steel
I have tried even drilling that and was useless in drilling down it
No free space to use a cut-off wheel tool, the one I have which works with an air compressor only rotates at 1,800 RPMs
so that failed
Even tried to use a Dremel tool with small cutting wheel but too small to reach the bearing
Ordered anther type the rotates at 20,000 RPMs and see if I have enough room using a 4-inch cut-off wheel with that tool to cut down the bearing
 

teamzr1

Supporting vendor
Why can't you use a long pry bar to lock between 2 of the pulley bolts whilst u lossen 3rd then turn pulley and do next bolt and then next fallen remove once all loose

Being the pulley is jammed near the right frame rail, only 1 bolt is just barely above the rail to even get a wrench on it
even then jamming the pulley seems not enough to prevent it turning when trying to break loose bolts installed 23 years ago

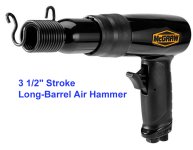
I ordered a Long-Barrel Air Hammer with 3 1/2" stroke to see if I can crack open the bearing case so that the broken shaft can come out with the attached mount for the pulley but again very little free space to get pulley, mount and shaft out, will see if that works

If I can find the correct replacement pulley then no need to preserve old one and maybe put enough jamming that might bend it but enough to
gets pulley bolts off one at a time

airjackhammer.jpg

BrokenWPulleyc.jpg
 

Roscobbc

Moderator
Is there anyway that unbolting engine mounts and perhaps axhaust header will allow that side of the engine to be jacked-up (lowered-down/canted to opposite side ?) and get better access? - guess east-west engine location and transmission location prevents that?
 

teamzr1

Supporting vendor
18 volt reciprocating saw with a T8 Carbide blade will make mincemeat of that shaft. Wear eye and ear protection

Problem is most cutters/saws. etc are too big as almost no free space to get them in and reach down where the water pump shaft
and bearing is to cover
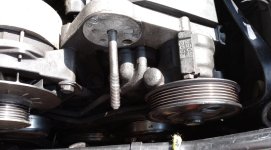
Look how far down that water pump pulley is and everything around there for any cutting blade to reach down there

(below the power steering pulley on the right) plus the 2 A/C Freon lines above it

This is a photo before the belt snapped the shaft of coolant pump, but the belt tensioner mounted to the long bolt taken off
Even tough you see high sunlight, none showing at the ground as suspension, frame, etc in the way
Try and even see the 19 bolts that hold that cover :-(


93Caddypulleys2.jpg
 

teamzr1

Supporting vendor
Is there anyway that unbolting engine mounts and perhaps axhaust header will allow that side of the engine to be jacked-up (lowered-down/canted to opposite side ?) and get better access? - guess east-west engine location and transmission location prevents that?

Being front-wheel drive, have a 4.9L V8 mounted sideways where you cannot even get to the spark plugs to replace,
the transaxle of course is mounted to the bottom of the engine, now all the half shafts, suspension, etc

They should have hung the guys who designed this with no space to service or maintain with engine bay too small

At each side of the engine is 2 long bolts, that go through the mounts on each side
I thought of loosening the 4 nuts and with floor jack ( car outside so on ground) mounted to a safe spot if I find one and
slowly raise engine but no higher than the length of mount bolts and see if that gives more clearance

Concern is of course parts installed 32 years ago, if they can come loose and any stress of lifting engine and transaxle
what that also affects hoses, lines, wiring lengths, half shafts, etc, causing damage to them

Or getting engine too high and then cannot line the 4 mount bolts back through the boltholes of mounts

Of course at 73 years old with a screwed up spine of mine and laying under the ground is a gamble :)
 

Roscobbc

Moderator
Know what you mean about getting under a car with a screw-up spine!
How does the OEM service manual suggest accessing the pump and its myriad of fixing bolts?
 

teamzr1

Supporting vendor
GM repair manual is useless as tits on a bull

Labor listed as 5 hours, so most of that is fighting off and on 19 bolts and nuts of different sizes and each is like a puzzle
as to what wrenches, extensions, etc. to use, over half of them cannot even get 1 hand on
Searching, I see dealers want from $700 to $1,000 for labor alone

Different story with the coolant pump shaft broke off and its pulley:-(

GM : no detail at all and make it sound like a simple repair process

REMOVE OR DISCONNECT

1. Drain cooling system.
2. Coolant recovery tank.
3. Water pump pulley (three bolts).
Apply tension to the drive belt to keep the pulley from rotating by forcing the belt tensioner into the drive belt with a breaker bar.
4. Accessory drive belt.
5. Water pump from vehicle.
6. Water pump gasket and discard.
7. Clean water pump and engine front cover sealing surfaces.

INSTALL OR CONNECT

1. New gasket on water pump cover studs.
2. Water pump and tighten all pump mounting bolts to the torque specifications.
3. Water pump pulley; install bolts finger-tight.
4. Accessory drive belt and tighten pump pulley bolts to 30 Nm (22 lb ft). Use accessory drive belt drag to keep the pulley from moving when tightening pulley bolts. If additional drag is needed, attach a 1/2 inch breaker bar to the belt tensioner and apply a load to the belt.
5. Coolant recovery tank.
6. Refill coolant.
 

Oneball

CCCUK Member
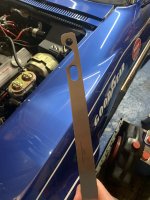
This is a BMW tool to hold a pulley while you loosen the bolts
IMG_2890.jpeg


Not the right size for a SBC but gives the idea, goes across two bolts while you loosen the third.
IMG_2891.jpeg
 

teamzr1

Supporting vendor
Thanks for the idea
Would not work for my case as only 1 bolt at a time sits right above the frame rail and pulley is cocked at an angle

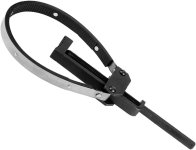
Think I will order and try this, may have to add a pipe at the handle to get more leverage

clamp_.jpg


Thus tool really is sold when wrenching on cranks or clutches for motorcycles, but I thought maybe it would help
me getting the 3 bolts off the pulley

I received this to find the width of the band was too wide and not enough free space between the frame rail and the pulley :-(
I was going to throw it in the garbage but after some swearing I decided to drill out one pop rivet on one end of the band
than slide the band under the pulley and after fighting that got that side of the band up to latch back to the top of the tool and use a small bolt and nut to reconnect

One 3 inches of space of the top of tool, so crammed a pipe on that to use for more torque
Had to turn pulley as only 1 head of a bolt can be higher than the frame rail
Used a 15-inch long 1/2 inch ratchet box wrench and held pipe in one hand while forcing bolt loose with the other
One off had to loosen the clamp tool, rotate pulley till another bolt was up and repeat this 3 times to get all of them out
 
Last edited:

62 C1

CCCUK Member
Can you get a (mini) angle grinder on the pulley and split the pulley to break and get it out of the way the access the casing? If you can you can then hopefully get to the pulley shaft after that. With compensating protection I have removed the disk shroud/spark deflector to get more of an angle if it won't move around enough. Obviously a now pulley adds to the cost but it is a tricky problem.
 

teamzr1

Supporting vendor
Can you get a (mini) angle grinder on the pulley and split the pulley to break and get it out of the way the access the casing? If you can you can then hopefully get to the pulley shaft after that. With compensating protection I have removed the disk shroud/spark deflector to get more of an angle if it won't move around enough. Obviously a now pulley adds to the cost but it is a tricky problem.

Thanks for the idea
Yes, I thought of taking the guard off as the new tool handles only 3 1/2 inch wheel and that would not go deep enough
so with guard of hope I can swap to 4 1/2 inch cut-off wheels.

With my updated post above I finally got the 3 bolts of pulley off but, as I assumed, was correct :-(
The pulley is now free from the mount but cannot get it out as the mount and length of broken shaft's length and with the frame rail just 2 inches away there is no room to get the pulley past the mount and out :-(

I tried a cut-off wheel grinder that uses 90 PSI air from my compressor, but the tool is crap, only does 1,800 RPMs and with all the parts by pulley and no space the tool was not working what was needed
I suspect the shaft came off at the backside where the birdcage of the pump is and the cover as seen is hard metal

As mentioned should have tomorrow the smaller cut-off grinder that rotates at 20,000 RPMs but question if the cut-off wheel can go deep enough to cut that metal
Or also get the air hammer, I did think about that and did order 1 flat and 1 for metal cutting chisels for the new air hammer
which at 19 SCFM (2.7 CFM @ 90 PSI) at 3,300 beats per minute

Hope if I could with cut-off at least get 2 cuts wide enough of shaft and then with air jack break that out and then be able to lift shaft and mount out to be able to get 19 fricking bolts and stud nuts off the cover

I have to get the pulley out, otherwise cannot take out the 4 cover bolts behind it


pump.jpg
 

62 C1

CCCUK Member
Even if you can't get to the centre/cut it in one go, you should be able to but it off in sections since I believe you can rotate the pully from what you have said.
 

teamzr1

Supporting vendor
Did you get the pulley off?

I did as you mentioned, and it was pure hell doing it but chopped up the pulley wide enough to get around the mount with shaft out
was a bitch doing this and not damage the frame rail or any other pulleys near it :-(


junk.jpg

Even had to chop up the cone of the cover that was behind the pulley as the mount/shaft was 4 inches long when the frame is only 2 inches in
front of the pulley


bolts.jpg
Now the problem is that cover has 19 bolts and bolt nuts
I have fought getting 12 of them off but the other 7 are buried, I cannot get a and on them and no real space getting sockets with ratchet extenders and knuckles in :-(


pulley.jpg

Had to locate and buy a new water pump pulley to replace the one I had to hack to pieces

Being 74 years old, with several discs in my spine screwed up and bending over for days, I am forced to take a break and try getting some pain relief before trying to find some way to get those other bolts out and then what a bitch it will be to install the new cover, all those bolts and pump :(

Bolts on the left side need to find a way to get to them for removal and installing and crazy is some are 10, 15 mm or Torx type
Guys who designed this Caddy should have been hung, but I hear most front-wheel drive vehicles with engine mounted sideways
and in this case a 4.9 L engine there is zero free space to do anything including the spakplugs and wires.
The 4 facing firewall, cannot even see them, much less replacing them

I will burn the fricking car down to the ground if I get this all done, start the engine and the belt still pops off !


93CaddyNewCoolantFana.jpg
 

teamzr1

Supporting vendor
Update

Long delay due to 93 Deville being outside and cold, rain and storm weather and waiting for parts being shipped

Took 9 hours today and was able to replace the water pump, the cover, gasket, pulley, belt, anti-freeze, and tensioner
Did this without taking the gamble of jacking the engine up with a 32-year-old car

Was like a puzzle as 24 bolts if different sizes and nuts getting them out as 90% are hidden from view and no space in getting hands or tools down there and back in and not having any coolant leaks

Was getting dark but did get some idle time to check for any leaks
Do a few cold and hot idles to help purge out any air pockets and will check again tomorrow and then do a testrun with OBD1 scanner to monitor ECT
 
Top