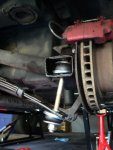
That bl**dy C3 handbrake.

antijam

CCCUK Member
Well, I finally got round to one of the jobs that my recently acquired Quickjack was intended for - sorting out the useless C3 handbrake! Having gone through the motions of the standard adjustments - brake shoes and cable adjustment - to no effect whatsoever, I armed myself with a comprehensive set of replacement goodies (courtesy of CK)......

6880

.....hoisted the car off the ground and lifted off the calipers to see the worst.
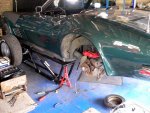
6878

It was obvious that a previous owner had been there before me and by the look of it had tried the easy replacements and given up on the more difficult ones. The front and rear cables looked newish, although the rear was not original pattern (it proudly bore the label 'China') and lacked the proper armouring between the frame and trailing arm. The rotors were in excellent condition and obviously recently replaced, which meant at least I didn't have to drill out the rivets to remove them. Once removed they revealed a very un-pretty sight. The shoes themselves were in quite good condition - not surprising since they had been doing nothing - everything else was a tapestry of rust...

6879

The workshop method of parking brake overhaul is very straightforward - once you remove the rear spindle assembly. This wasn't a job I wanted to get into so I elected to follow the simpler but less easy method. This is well documented in literature and videos on the web so I won't go into detail, but my main worry was that the brake back plates were in pretty sorry condition and these can't be replaced without spindle removal. Previous owner had done some serious bodging to try to remove the brake actuating lever and strut in one piece - despite them being obviously designed to come apart - and the resultant widening of the slot in the plate meant potential problems when re-assembled.

Anyway, I straightened them out as far as possible, stripped out everything and started rebuild with new parts. The original shoe retainers were toast so new ones had to be split to fit them behind the shoe anchor bolts and then tack welded back together again. The supposedly trickiest bit of assembly is fitting the shoe retaining springs and collars over the retaining pins. I found that with the pins held captive with a loop of fishing line, fitting the springs and collars wasn't too bad.

With everything back in place and new cables fitted....
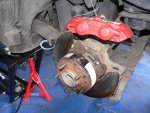
6881

.....( the armouring on the rear one makes fitting this a trial of strength!) and basic adjustments made, it was back on the ground and off for a drive to 'burnish' the new shoes. Okay, a few readjustments need to be made after burnishing, but at last I have joined what I suspect is a fairly exclusive club - C3 owners with a functional handbrake!
 

Roscobbc

Moderator
Well done - a difficult and unpleasant job - when I first did it one mine I replaced all components (including shoes) with stainless steel parts - on the presumption this would make a big difference - it didn't......except perhaps for the fact that surface rust won't develop.....the design is flawed, irrespective of whether the shoes are stainless or steel the gauge of material used is too thin - it flexes, the lining material can crack. 1 and 3/4 tonne of car being 'held' by a brake probably smaller than what you'd see on a 50cc Honda Cub :eek:
 

antijam

CCCUK Member
Well done - a difficult and unpleasant job - when I first did it one mine I replaced all components (including shoes) with stainless steel parts - on the presumption this would make a big difference - it didn't......except perhaps for the fact that surface rust won't develop.....the design is flawed, irrespective of whether the shoes are stainless or steel the gauge of material used is too thin - it flexes, the lining material can crack. 1 and 3/4 tonne of car being 'held' by a brake probably smaller than what you'd see on a 50cc Honda Cub :eek:

As you say, it's not an efficient design. I too replaced the hub components (although not the shoes) with stainless items although I'm not a great fan of stainless in high pressure components - such as the shoe adjusters - where they can be prone to galling. That said, one of my original adjusters was rusted solid so I was between a rock and a hard place. When I bought the parts CK only had the rebuild kit in stainless. At least the brake's now working to some extent and hopefully by the time it needs attention again I shall be long gone.
 

kentvette

CCCUK Member
Just be sure to check that the parking brake shoes are not "binding" when the brake is in the released position - it's tricky to determine even with teh callipers off, with the drive-shafts still connected. But, if they are, the hub will heat up, so placing your a hand around the wheel centre after a run of about 5 miles will tell if its warm. If it is, you'll cook the bearings - ask me how I know that!
 

antijam

CCCUK Member
Just be sure to check that the parking brake shoes are not "binding" when the brake is in the released position - it's tricky to determine even with teh callipers off, with the drive-shafts still connected. But, if they are, the hub will heat up, so placing your a hand around the wheel centre after a run of about 5 miles will tell if its warm. If it is, you'll cook the bearings - ask me how I know that!

Thanks for the tip - I don't think I need to ask how you know......:(
 

antijam

CCCUK Member
An update. Having at last gained a (fairly) functional handbrake I discovered I now had a spongy brake pedal. Since I didn't disconnect any brake lines while doing the work I figured with the calipers removed I must have inadvertently let the pistons ride out to the point where air was drawn into the master cylinder. :(

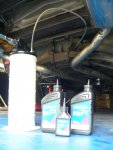
Ho hum - so it's back on the Quick-Jack for a bleeding session. Bleeding having produced a satisfyingly hard pedal, with my fluid extractor to hand it seemed a good opportunity to change the diff oil, since I doubt it's been done since new. With the spare wheel carrier removed, access to the filler plug is easy and my luck was in since it came loose with one good heave on a spanner. I plug in the extractor tube, turn on the compressor and relax with a coffee while the 'sucker' does its job. With the old oil out I replace it with genuine AC Delco SAE 75W - 90, not forgetting to add the all important LSD additive. Before replacement I wrap the filler plug thread with Teflon tape to ensure easy removal (and no leaks) in the future.

P1320262.JPG

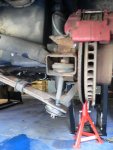
The trouble with getting under the car is you notice other things that could do with attention. My car has always sat 1" lower on the left than the right and I see that spring mount bolt and rubbers look well past their sell-by date.....

P1320264.JPG

so I order up a set of replacements, opting for adjustable bolts to allow me to tune out any ride height discrepancies side to side.

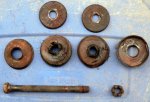
On disassembly the originals do indeed look past their prime...

P1320271.JPG

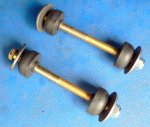
... the replacements look much better and have polyurethane bushes in place of the original rubbers!

P1320266.JPG

I find it's not just the bolt assemblies that are knackered but the spring mount cups fitted to the spring and trailing arm are toast too. The originals are swaged to the spring and arm but with advanced rusting they don't put up much resistance to being prised off. There seems no obvious point in swaging these on, since once in place they're going nowhere. I suspect it was originally done on production to ensure that they didn't get left out on assembly. Anyway, I replace them without swaging.

P1320270.JPG

Back on the ground and a first adjustment for ride height made, I find the car now sits parallel to the road, which is satisfying. I think the previous discrepancy was probably due to excessive and uneven wear in the mount rubbers. Gratifyingly I now have the ability to adjust out any side to side difference should it occur again.

P1320272.JPG

Next job has to be replacing the soft top - not a problem to be addressed lightly I fear.:unsure:
 

kentvette

CCCUK Member
Nice work! When you take the car out, go and do some gentle "figure of eights" in a car park or somewhere, to get the LSD additive fully "embedded" in the clutch packs in the diff.

Out of interest, are your new spring bolts drilled for a split pin? When we replaced our spring with a "plastic" item, back in 1997, it came with "adjustable" bolts with Nyloc nuts, but the bolts are drilled, so I still slot a split pin through when I have them apart. It's also handy for ensuring the ride height goes back to where it was.
 

antijam

CCCUK Member
Out of interest, are your new spring bolts drilled for a split pin? When we replaced our spring with a "plastic" item, back in 1997, it came with "adjustable" bolts with Nyloc nuts, but the bolts are drilled, so I still slot a split pin through when I have them apart. It's also handy for ensuring the ride height goes back to where it was.

The new bolts are longer than the originals at 8" and not drilled for a split pin . I'm now relying on a Nyloc rather than a split pinned castellated nut to prevent the rear suspension collapsing. When I've made final adjustment I may fit an additional locknut for greater security.
The longer bolts are designed to allow you to lower the ride height if so desired. I have no such desire and have set my car ('71 convertible) to 8" clearance between the frame and the ground, measured just in front of the rear wheel. An internet search suggests that the factory setting at this point should be 7.95" so I reckon I'm within a gnats cock of nominal. Ride height depends on the condition of the 'rubbers' on the spring bolt and over the years I guess most cars will sag significantly. The Polyurethane replacements should probably have a longer life.
 

kentvette

CCCUK Member
The new bolts are longer than the originals at 8" and not drilled for a split pin . I'm now relying on a Nyloc rather than a split pinned castellated nut to prevent the rear suspension collapsing. When I've made final adjustment I may fit an additional locknut for greater security.
The longer bolts are designed to allow you to lower the ride height if so desired. I have no such desire and have set my car ('71 convertible) to 8" clearance between the frame and the ground, measured just in front of the rear wheel. An internet search suggests that the factory setting at this point should be 7.95" so I reckon I'm within a gnats cock of nominal. Ride height depends on the condition of the 'rubbers' on the spring bolt and over the years I guess most cars will sag significantly. The Polyurethane replacements should probably have a longer life.

That all sounds good, and not a bad idea to add a lock nut. Can't say I'm really into lowered suspensions unless its part of a "whole hog" restomod set up, and even then it has to be just right.

I put poly bushes on our strut rods pretty early on, so early 90's I guess. At that time there were mixed reviews (probably still are!), but I have had no issues. They were sooo much easier to fit and when we took the suspension apart a couple of years ago I was amazed at what a good condition they were still in.
 

Chuffer

CCCUK Member
Been there , done that too ! I replaced my strut bolts and bushes on my 1980 over the winter of 2018 /19 with longer adjustable bolts and polybushes . The original bushes were well butchered .One hell of a fiddley job :mad: but well happy with the outcome :)
 
Top