72 Corvette - Restoration Updates

TimP

CCCUK Member
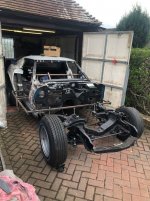
Where did they store your car for the last 20 years? That’s nasty.
In the nearest swamp I think. :)

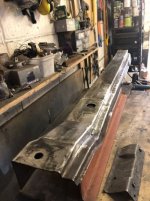
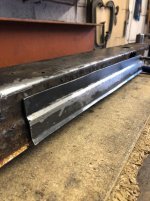
I made one of these sections last week, 2 of them should complete that side as it has a constant section nearly all the way down. It's a bit wavy but I will straighten that out as I fit it. Just waiting for some more 12 gauge steel to arrive early next week before I plan the next move as it will determine the order of repair.
Birdcage brace 112.JPG
 

TimP

CCCUK Member
Seems to be a while since I posted anything so just in case anybody thought I have been slacking.....

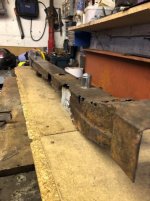
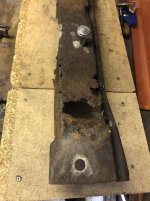
Here are a couple of pics of the passenger side birdcage sill piece just after I started ..
Birdcage brace 111.JPG Birdcage brace 114.JPG

And here's where I am right now. The top and the inner side have been refurbished. Just checking the fit back on the car before welding the new outer skirt on. Its already 100 times more rigid than it was before (and about twice the weight). Once this has been done I will need to do some final finishing and carefully check all the welds to make sure that they are full depth. I know some aren't so they will need to be done again from the underside. It's also a little bowed so some straightening will be required before the new side is welded on (or perhaps use the new side to pull it back into shape).


Birdcage brace 113.JPG

More to follow in a week or so when this is complete.
 

TimP

CCCUK Member
Glad to see you've been busy, must be nearly all done now:LOL:
Ha! I wish.... :) Once I have finished the passenger side I have to hype myself up to doing the same thing on the drivers side. That's going to be harrrrrrrrrd. Can't wait to get this car on the road, but there's so much more to do.......
 

Mad4slalom

Well-known user
Seems to be a while since I posted anything so just in case anybody thought I have been slacking.....

Here are a couple of pics of the passenger side birdcage sill piece just after I started ..
View attachment 13867 View attachment 13869

And here's where I am right now. The top and the inner side have been refurbished. Just checking the fit back on the car before welding the new outer skirt on. Its already 100 times more rigid than it was before (and about twice the weight). Once this has been done I will need to do some final finishing and carefully check all the welds to make sure that they are full depth. I know some aren't so they will need to be done again from the underside. It's also a little bowed so some straightening will be required before the new side is welded on (or perhaps use the new side to pull it back into shape).


View attachment 13868

More to follow in a week or so when this is complete.
Tim! “Slacking” is not a word any of on here would ever associate with you! Your tenacity and sheer volume of work is mind blowing 😁👍
 

TimP

CCCUK Member
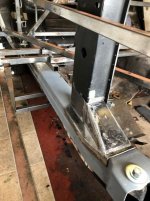
Just to wrap up this item then here are a few pics from the (somewhat extensive) rebuild of the passenger side birdcage sill. Having done quite a bit of research to find appropriate bits of metal to replace the rusted areas I found that a 50mm square of 2.5mm thick (12 gauge) steel tube has the same cross section radius as the birdcage sill. That saved a huge amount of work in getting the right section.
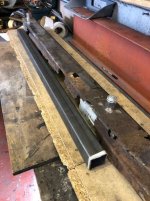
Birdcage brace 116.JPG

So that meant I just had to cut out the right shape from the tube and then fit in the right place...
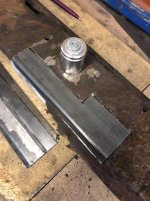
Birdcage brace 117.JPG

A lot of the holes that are in sill needed to be drilled as I had replaced the metal where they were located. so using the glassfibre sill cover as a template I was able to drill those through.
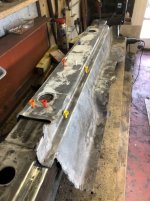
Birdcage brace 118.JPG

... and after a lot of cutting, welding and grinding (repeated seemingly for ever) I have ended up with ....
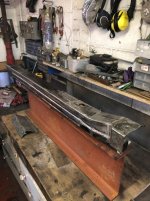
Birdcage brace 119.JPG Birdcage brace 120.JPG

I have left out the (considerable) effort required to keep this sill straight. Warping and distortion inevitably occurred with so much welding and I got used to working in small sections, very slowly and then checking the straightness and fit quite often so that I could tell when things went awry. Sometimes the distortion didn't seem to take full effect until quite a bit later - I suppose the metal has to work out the internal stresses caused by the heat and this takes a little while.

However the 'finished' (there is still some finishing work to do) sill fits really well - nice and straight on the body mounts. It's a little rough in places but its really strong and rigid. When I took it off the car I could twist the sill about 30degrees in each direction with very little effort.

I still need to fit the safety belt guide plate (see on the right in the last pic and below clamped in place) but that's relatively straight forward. When the sill is on the bench anyway....
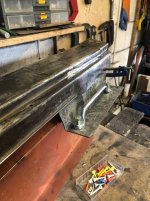
Birdcage brace 121.JPG

The hinge post joins to the sill with one of these (I still have to cut out the hole for the #2 body mount bolt):
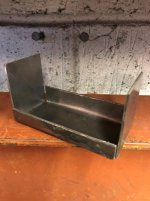
Birdcage brace 115.JPG

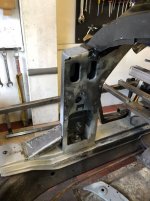
And those familiar with the birdcage will know what this is...
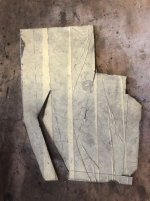
Birdcage brace 122.JPG

Next steps are to refurbish the rear of the sill to the birdcage door striker panel area, then fit the sill, the hinge post and the lower windscreen corner back on the car, (probably) rivet each piece in place temporarily, check everything at least 100 times and then once more, and then weld everything in place. Then the other side......
 

TimP

CCCUK Member
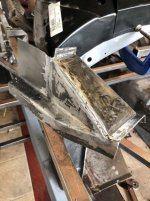
Following on from the last photograph the sheet metal shown has now been folded, bashed, cut, welded and ground into the following shape...... These are available new in the US (Zip Corvette) but at $199 each they would probably be £200 plus by the time they reach the UK.
Birdcage brace 123.JPG

Nearly there. Just need to drill the holes for the lower door hinge bolts and the puddle welds....
Birdcage brace 124.JPG

Everything seems to fit quite nicely so with a little luck I should have the passenger side all welded in place by the end of the month.
 

TimP

CCCUK Member
Great stuff as usual! Do you think the car will be back together in time for next year's nationals?
Good question! I will be very disappointed if I don't get the car road legal sometime during 2022 - it's fiftieth anniversary year - but not sure about being ready for a long road trip by mid July. I hope to have the birdcage and related bodywork finished by the beginning of March. Will try and get the firewall, engine and transmission back in by the end of May. So having the rest of the bodywork, screen, wiring/electrics, interior and the endless list of small items that are required and enough time for a complete shakedown will be really pushing it. A 'stretch target' as they used to say at work. Never say never though as I really would like to get everything done sooner rather than later.....
 

James Vette

CCCUK Member
@TimP you've probably answered this but I have a few questions: Are you redoing the engine to give more hp and torque than stock and what exterior and interior colours are you going for and are they stock colours? Thanks.
 

TimP

CCCUK Member
Hi James, I am going to leave the engine stock and use the existing engine parts, Quadrajet and distributor once they have been rebuilt. I'm not looking to get a lot of horsepower out of the engine and I will be very happy with the standard 200hp. If however, some components need replacing I will buy modern equivalents that will make things more reliable or easier to set up. After a lot of thought I have decided to retain the existing Classic White paint with the red interior - I think it's a good colour combination and should look nice when it's all finished.

I hope to post a progress report on the birdcage work next weekend - it's taking f-o-r-e-v-e-r. Much longer than I thought it would.
.
 

TimP

CCCUK Member
Whilst I was hoping to get the passenger side birdcage all completed by the end of November, I have had (another!) change of plan. It also gives me a good excuse for missing my deadline. The hinge post is mostly welded in place and the rear of the birdcage sill is also mostly welded up. Before finishing this side by completing the welding at the rear and and fitting the hinge post boot (only bolted on in the photo) I decided that checking the overall dimensions and positioning the lower windscreen and corner pieces would be a good idea.
Birdcage brace 126.JPG
The measurements that I took before stripping everything down were checked and everything seems to be OK. I also fitted the T-Tops to check that they still fit (fortunately they do) and temporarily refitted the firewall to check that this would still go on correctly. If the dimensions were good, I couldn't think of a reason why it wouldn't fit but it just seemed a reasonably quick and reassuring (if everything fitted correctly) thing to do.
Birdcage brace 125.JPG
The firewall of course also helps with the positioning of the lower windscreen surround and showed that my original positioning of the lower surround was a little high.

When I originally removed the firewall some of the bonded surfaces ended up pretty rough. Thus I have decided to prepare and clean up the firewall and get it ready for final fit even though I don't need to do that for quite a while. This however does help to endure that all the relevant pieces are in the right places and that joining surfaces are clean and will fit together well.
Firewall 3.JPG

Thus hopefully so I should end up with a firewall that will look cleaned up, painted and nearly new. There is quite a lot of surplus bonding agent and carpet glue to be removed which should keep me busy for a week or two. Its also a bit from a change of the welding, grinding cycle that I have been through over the last 2-3 months.

I have trial fitted the original windscreen and that seems to fit ok too. I say 'seems to' - we have all got used to Audi/Mercedes etc. levels of panel fit and this isn't quite there ....:)
 
Top