You are using an out of date browser. It may not display this or other websites correctly.
You should upgrade or use an alternative browser.
You should upgrade or use an alternative browser.
72 Corvette - Restoration Updates
- Thread starter TimP
- Start date
Mad4slalom
Well-known user
Is that fuel cap a clue tob the final colour Tim?Having received some domed star lock washers in the post and also visited my favourite nut and bolt shop in Hove (Namrick - highly recommended) to get the necessary set screws the gas door assembly is now almost complete, just the rubber bumpers to be attached. My wife says it looks like a toilet seat....
View attachment 23550
Have continued removing the paint on the front clip - interestingly (or perhaps not) there is at least two extra (ie non GM) coats of paint on some of the front end. I don't know how many of you have done the full paint strip but rest assured, it is one of the most mind-numbingly boring things to do on a car but ... progress is being made.
View attachment 23549
To keep the little grey cells happy though (and as respite from the wettest July I can remember) I have also done some work on the drivers door in the workshop.....
The front corner had a few rust holes as I think this area collects water and I can't see any trace of GM applied paint, so its probably quite vulnerable. Decided to chop it all out....
View attachment 23551
... make a (somewhat complex) patch ....
View attachment 23552
Weld, fettle, add a little filler and added a coat primer to stop it rusting until I can get the rest of the door completed.... It's an all metal repair and water tight, just using filler to get rid of some surface imperfections. Once I have completed the repairs and got the inside of the door looking respectable I will bond the glass fibre outer back to the metal inner. It will get a coat of rust resisting paint, or similar on the inside and some sort of drain hole to stop it rusting through again.
View attachment 23553
Plenty more to do ....
Mad4slalom
Well-known user
I always used to love the final wet flatting of primer with 800 as you really can see what the finished paint is going to look like .Your Mrs must be really small!
Coming along well isn’t it?!
If you think stripping paint is boring wait till you’re rubbing down primer.
Your Mrs must be really small!
Coming along well isn’t it?!
If you think stripping paint is boring wait till you’re rubbing down primer.
In reply:A couple of things Tim
When I was still at work, we often used Namrick for unusual nuts and bolts, it's amazing what they stock
You wife must have a very small behind
My doors do have drain holes (although were well blocked!)
I have bought from Namrick many times online but it was the first time I actually went to the shop - it's a great place to go - it's laid out a bit like a sweet shop and you can't help but..... have one of these, and a couple of those and a bagful of .......etc. until you have bought about 5 times more than you expected. Worth a visit.
It's more than my life is worth to comment on that.
I will check my other door for positioning but otherwise a well placed drill should sort that out.
Yes definitely coming on and doing things 'topside' seems to highlight progress so much better.Your Mrs must be really small!
Coming along well isn’t it?!
If you think stripping paint is boring wait till you’re rubbing down primer.
It's a possible at the moment - it's very nice particularly in the sunlight, and I think it goes nicely with a red interior although this combination was never produced officially (at least in the early seventies). Bentley do some nice green/red combos and I think it looks pretty good. I'm going to try an electric blue as well when the damp/rain/deluge stops (probably about October at this rate!) but the green is definitely a contender. I have spent enough time wandering around car parks looking at paint colours to get me on the local constabulary watch list.Is that fuel cap a clue tob the final colour Tim?keep up the fantastic work.?
I agree - there's something immensely satisfying about a getting a really smooth primer finish without imperfections and ready for topcoat. A stripped car looks like one of those camouflage paints where you can't see the features or curves, it's only when you get the first consistent colour (ie the primer) that the shapes start to come back out. And it has that feeling of 'nearly there' which is very motivating. The original Florida-sun worn paint was rougher than the sand paper that I used to get it off with so smooth is a massive improvement.I always used to love the final wet flatting of primer with 800 as you really can see what the finished paint is going to look like .
So.... having spent three weeks or so removing paint using a scraper and a sander I needed to do some repairs to get the bodywork back to how GM intended. Its hard physically and mentally, so easy to skip over things like the indicator recesses but they were stripped nevertheless.
Starting with a selection of horrors...
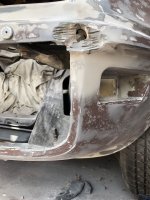
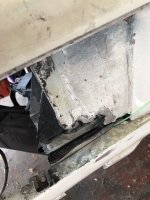
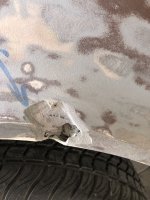
and after quite a bit of glass fibre and filler work ended up with...
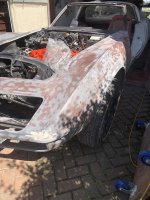
I have forgotten to drill the hole for the front bumper but I can do that later. Blue pen marks indicates where areas of work are required.
Painted the inside of the front moulding for entirely cosmetic reasons and I had some paint to use up...
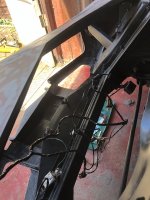
Before that I had partially removed the radiator support so that I could thread the front lights/horn wiring loom to the front end.
After a final round of sanding to get rid of any remaining areas of old paint to be removed I applied a couple of coats of epoxy primer to seal the glass fibre (should work) and act as a filler layer. It's a bit rough close up so there will be a lot of flatting later on to get it to a paint ready finish but even so it has transformed the look of the car, which is very pleasing and makes a lot of that monotonous work worthwhile (compare pic 4 with pics 7 and 8!). It has also highlighted, now that that the camouflage effect has been overpainted, that I still have 4 or 5 small areas or work to do - nothing much, just a few small holes and gouges that I missed. Also a small area above the passenger side bumper mount that doesn't look quite right but could just be odd lighting. Both front bumper mounts required a lot of repair work so it wouldn't be surprising if the profile was a little off there.
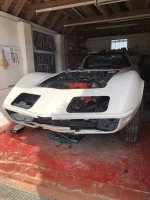
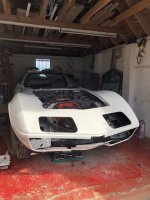
Secret's out - just noticed that my painting equipment, on which a lot of expense has been spared, is in shot. Oops Just lost all credibility.
Next steps are: a) lot of flatting, b) some more repair work, c) another coat. d) Fit as many parts to the front end as possible - including (hopefully) the light pods. e) return to the cabin and complete the fitting of the wiring looms and instruments, ventilation, insulation and sound proofing. It's all coming together quite fast now. Probably shouldn't have said that.
Starting with a selection of horrors...


and after quite a bit of glass fibre and filler work ended up with...


I have forgotten to drill the hole for the front bumper but I can do that later. Blue pen marks indicates where areas of work are required.
Painted the inside of the front moulding for entirely cosmetic reasons and I had some paint to use up...

Before that I had partially removed the radiator support so that I could thread the front lights/horn wiring loom to the front end.
After a final round of sanding to get rid of any remaining areas of old paint to be removed I applied a couple of coats of epoxy primer to seal the glass fibre (should work) and act as a filler layer. It's a bit rough close up so there will be a lot of flatting later on to get it to a paint ready finish but even so it has transformed the look of the car, which is very pleasing and makes a lot of that monotonous work worthwhile (compare pic 4 with pics 7 and 8!). It has also highlighted, now that that the camouflage effect has been overpainted, that I still have 4 or 5 small areas or work to do - nothing much, just a few small holes and gouges that I missed. Also a small area above the passenger side bumper mount that doesn't look quite right but could just be odd lighting. Both front bumper mounts required a lot of repair work so it wouldn't be surprising if the profile was a little off there.


Secret's out - just noticed that my painting equipment, on which a lot of expense has been spared, is in shot. Oops
Next steps are: a) lot of flatting, b) some more repair work, c) another coat. d) Fit as many parts to the front end as possible - including (hopefully) the light pods. e) return to the cabin and complete the fitting of the wiring looms and instruments, ventilation, insulation and sound proofing. It's all coming together quite fast now. Probably shouldn't have said that.
Attachments
I'm in the middle of having the garage refurbished as it's a bit tatty, needs some reinforcement/repair and is not as secure as I would like. The garage and the workshop beneath it is being emptied completely so the rebuild is coming along a little slowly but it has given me a chance to sort things out a bit and I have managed to fill a 3 year skip with some of the rubbish that I have collected over the last 20 years or so. It should give me a lot more room when it's all done but for now I can only do a few light jobs whilst I wait for the builder to do the necessary.....
I have decided to concentrate on the interior, where possible, and refurbish what's left inside, which is actually not much. The main bit being the rear window storage tray that, after a little Plus Gas persuasion came out for a spring clean....
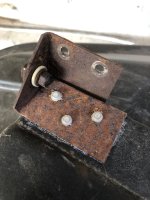
The hinges and catch were a little rusty so the appropriate bits were removed and placed for a few hours in the electrolysis tank.....
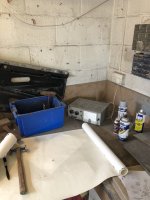
... then painted and reinstalled. The final assembly looks doesn't look too bad bearing in mind it is 50+ years old!
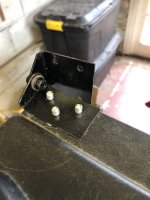
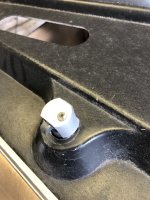
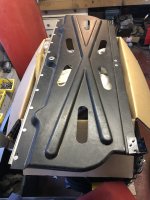
Next I will concentrate on the area behind the seats. This part will be cleaned up and sound deadening/insulation installed and then refurbish and refit the three compartments.
I have decided to concentrate on the interior, where possible, and refurbish what's left inside, which is actually not much. The main bit being the rear window storage tray that, after a little Plus Gas persuasion came out for a spring clean....

The hinges and catch were a little rusty so the appropriate bits were removed and placed for a few hours in the electrolysis tank.....

... then painted and reinstalled. The final assembly looks doesn't look too bad bearing in mind it is 50+ years old!


Next I will concentrate on the area behind the seats. This part will be cleaned up and sound deadening/insulation installed and then refurbish and refit the three compartments.
To make it easier to move my car and all the bits that go with it, I have been slowly fitting any parts that make sense to bolt on. I can now treat these areas as a 'rolling restoration' and remove/refurbish/refit parts as required. It saves an awful lot of space too.
The rear end is coming along nicely - the passenger side had been involved in some sort of accident and the repairs to this area required new holes to be drilled for the bumper.
You can't see it but the drivers side exhaust bezel is fitted but the right one (probably because of the those repairs) doesn't quite fit at the moment. All the brackets on the other side are fitted as is the spare wheel housing.
\
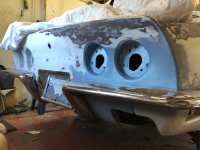
The passenger bumper is very corroded and has a hole in it - this will be repaired at some point if I can't find a suitable replacement.
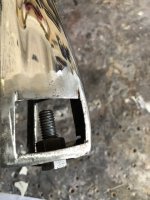
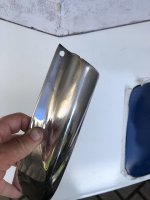
I had bought a couple of front fender guards - one with a couple of holes in, as the captive nut had started spinning and the PO decided to cut it out with a grinder. I have welded in two new sections but it will need to be rechromed at some point (and I think that hole also has to go but that should be straightforward. Not sure why its is there - I thought it was supposed to be there until I looked at the other one).
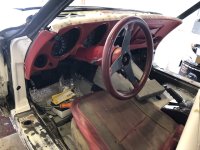
The interior is coming on too - it all seems to fit although clearly some parts will need to be replaced at the appropriate time. The steering wheel is connected to the front wheels and the handbrake actually works!
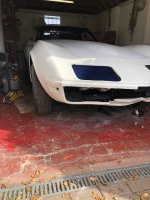
At the front, the centre grill and light pods have been loosely fitted - lots of adjustment required there.... and the hood, wiper door and filler grille are all in place.
The interior is still having the sound deadener fitted and the rear compartment refurbishment should be finished over the next couple of weeks.
The rear end is coming along nicely - the passenger side had been involved in some sort of accident and the repairs to this area required new holes to be drilled for the bumper.
You can't see it but the drivers side exhaust bezel is fitted but the right one (probably because of the those repairs) doesn't quite fit at the moment. All the brackets on the other side are fitted as is the spare wheel housing.
\

The passenger bumper is very corroded and has a hole in it - this will be repaired at some point if I can't find a suitable replacement.
I had bought a couple of front fender guards - one with a couple of holes in, as the captive nut had started spinning and the PO decided to cut it out with a grinder. I have welded in two new sections but it will need to be rechromed at some point (and I think that hole also has to go but that should be straightforward. Not sure why its is there - I thought it was supposed to be there until I looked at the other one).


The interior is coming on too - it all seems to fit although clearly some parts will need to be replaced at the appropriate time. The steering wheel is connected to the front wheels and the handbrake actually works!

At the front, the centre grill and light pods have been loosely fitted - lots of adjustment required there.... and the hood, wiper door and filler grille are all in place.

The interior is still having the sound deadener fitted and the rear compartment refurbishment should be finished over the next couple of weeks.
Quick update...
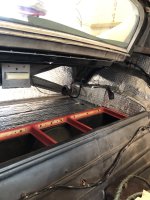
I have reinstalled the rear window tray, replaced the light at the back of the storage area behind the seats and put down a layer sound deadening. Now ready for carpet.
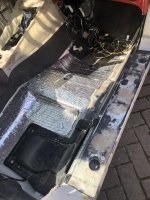
... and more sound deadening in the passenger side of the cockpit.
The car is now safely behind the house so that the garage can be repaired...it's looking more like a complete car than it has in a long time....
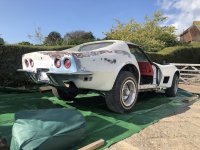
Still loads to do....
I have reinstalled the rear window tray, replaced the light at the back of the storage area behind the seats and put down a layer sound deadening. Now ready for carpet.

... and more sound deadening in the passenger side of the cockpit.

The car is now safely behind the house so that the garage can be repaired...it's looking more like a complete car than it has in a long time....

Still loads to do....
Mr. Cricket
Committee Member
on the road sometime next year???
Be good to showcase it as the Nationals next year?
Yes - I really hope so. I will be disappointed if I can't get it on the road (but not necessarily finished) by the start of next summer. I will need to get the body off and the engine/transmission working during the winter but I think it's achievable.on the road sometime next year???
I'd love to be able to but that's a bit of a stretch I think. I would want to prove the reliability first as it's a long haul to the Nationals from the South here. Never say never though!Be good to showcase it as the Nationals next year?
So where was I ......
My garage is nearly fully refurbished - only a new garage door (an 8 week wait from the time of ordering) is stopping it from being finished. However, my Corvette is now back in the garage and I am glad to say I am making progress again, albeit slowly.
I thought I would bite the bullet and refit the headlight pods. I have been putting this for a long time as I know how difficult, fiddly and irritating this process can be. Feeling positive though, I thought I might be lucky and get this done quite quickly - other jobs I had been dreading (handbrake cable replacement for example) had been much easier that expected so I thought I might be worrying needlessly and this might go well too. Silly me.
So ... two weeks of effort later I have now fitted them
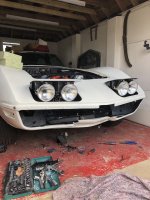
The major problem I faced was that despite all adjustment being made in all directions they just sat too low and would not open without fouling the body. To cut a long story (a very long story) short I came to the conclusion that the pattern pieces I fitted were out of true and I once I had made the decision to move one or two of the holes it all started to come good and they now fit quite nicely. Not perfect yet but good enough to be operable. Knowing that they will come out again later I decided not to try and make them perfect but just be happy knowing that they can be made perfect when I need them to be.
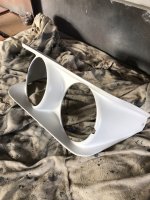
The pod bezels have been painted...
The centre grille and other hardware has been fitted although some of the fasteners are not the final ones)
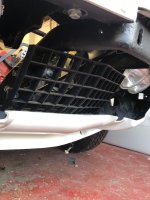
...and plumbing the pipes has started....
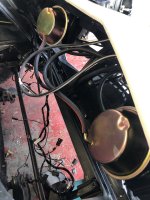
You have to remember to fit the vacuum actuators the right way round - they are handed. Put them in the wrong way round and the pipe connections face the wrong way. Ask me how I know.
I haven't finished this process yet and when the rest of the installation has been done and they have been tested I will cut some of the pipes to fit - they are a little longer than they need to be as you can see.
There's more to come on this but hope to have the front vacuum system (wiper door and lights) and the wiring fitted and tested in a week or so.
My garage is nearly fully refurbished - only a new garage door (an 8 week wait from the time of ordering) is stopping it from being finished. However, my Corvette is now back in the garage and I am glad to say I am making progress again, albeit slowly.
I thought I would bite the bullet and refit the headlight pods. I have been putting this for a long time as I know how difficult, fiddly and irritating this process can be. Feeling positive though, I thought I might be lucky and get this done quite quickly - other jobs I had been dreading (handbrake cable replacement for example) had been much easier that expected so I thought I might be worrying needlessly and this might go well too. Silly me.
So ... two weeks of effort later I have now fitted them

The major problem I faced was that despite all adjustment being made in all directions they just sat too low and would not open without fouling the body. To cut a long story (a very long story) short I came to the conclusion that the pattern pieces I fitted were out of true and I once I had made the decision to move one or two of the holes it all started to come good and they now fit quite nicely. Not perfect yet but good enough to be operable. Knowing that they will come out again later I decided not to try and make them perfect but just be happy knowing that they can be made perfect when I need them to be.
The pod bezels have been painted...

The centre grille and other hardware has been fitted although some of the fasteners are not the final ones)

...and plumbing the pipes has started....

You have to remember to fit the vacuum actuators the right way round - they are handed. Put them in the wrong way round and the pipe connections face the wrong way. Ask me how I know.
I haven't finished this process yet and when the rest of the installation has been done and they have been tested I will cut some of the pipes to fit - they are a little longer than they need to be as you can see.
There's more to come on this but hope to have the front vacuum system (wiper door and lights) and the wiring fitted and tested in a week or so.
I can confirm that, having spent many long hours lying on it trying to fit theheadlights, that it is not warm. Takes most of the evening for me to warm up again.That floor looks cold!


