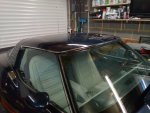
Exciting day - rebuild of 78 coupe

Forrest Gump

CCCUK regional rep
I've found the invoice for the tape I used but unfortunately that particular supplier is no longer trading. It was black P.E double sided foam glazing tape 10mm wide x 4.8mm thick. I applied two layers of this, one on top of the other and carefully aligned to give a total thickness of 9.6mm. This worked for me and held the screen at the right height.
Heres another company that has similar...
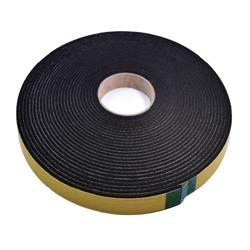
Nb I've edited the above after a message from John prompted me to remember what I actually did! (it was about five years ago).....
 
Last edited:

johng

CCCUK Member
Been working on the t tops. Fitted the stainless trim, handles and new rubber seals and spent ages trying to adjust them to fit. Can't get the t tops to sit flush with the roof in the middle, I'm hoping that given a bit of time the new rubber will compress and then I will be able to get them to sit lower. Good news with the passenger door glass. I already had it adjusted as far out as it would go, but it didn't look like there would room for the b pillar weatherstrip. However the weatherstrip is very soft and I have managed to shut the door without breaking the glass. Haven't tried opening the window yet though! Still need to try out the driver's side as well.

8857
 

johng

CCCUK Member
Had another go at adjusting one of the windows today. The good news is that I've managed to get the top of the glass far enough outboard to shut the door. The B pillar weatherstrip is very soft, so I didn't need to get it as far out as I'd thought and by using some grips to pull the runners fully inboard the glass fits nicely and the window even goes up and down! The not so good news is that getting the other adjustments right hasn't proved to be so easy. I needed to get the T top adjusted properly to set the height of the side window, then I found that I needed to push the glass backwards as far as possible to fit in the A pillar weatherstrip, but this resulted in the back top corner just catching the body as you close the door :( Whilst standing thinking what to do about this I realised that the door itself has dropped a little at the back. Trouble is it looks like the bolts for the top hinge are going to be very hard to get to now I've refitted the instrument panel.
 

Oneball

CCCUK Member
Can’t remember which way round it is but the door end of the hinge is slotted one way and the pillar end the other (vertical/horizontal). Have you got the guide buffer in the b pillar?
 

johng

CCCUK Member
I can't find any mention of a buffer or wedge in my AIM, so I guessing they weren't fitted to a 78. Could one of you other 78 owners let me know if you've got them.
 

johng

CCCUK Member
Sorted out the window adjustment today. My problem was that I didn't have the vertical end stops in both runners set at the same height, When the window got fully up it hit the rear stop first then rotated the window a little bit until it hit the front stop. Having fixed this I've now got it to line up nicely all round. Also the T top rubbers have compressed a bit already so it's now much easier to fit the tops. I should be able to remove a shim or 2 now to line up the tops with the roof. Think I'm going to have to readjust the door at some stage, but I'm going to leave that until I can get someone round to help me. I glued on the passenger door weatherstrip today, that's not as easy as the T top weatherstrip, because it doesn't have the little pins to hold it in place. I tried using strips of masking tape but they didn't hold very well, so in the end I shut the door. Probably find the door is glued shut tomorrow!
 

johng

CCCUK Member
Measured the gap this afternoon it's 13mm.
Finished rewiring my rear lights today as well. I've used amber and white LEDs in the reversing light housing, so they flash amber for indicators and shine white for reversing lights. Would have been a much easier job if I'd finished it before putting the rear bumper on. My passenger door wasn't glued shut, but a section of the weatherstrip along the back edge of the door hadn't stuck very well, so I've re-glued that bit and clamped it in place with a few pegs
 

johng

CCCUK Member
It's next to the gear selector in the same unit as the switch that prevents you starting the car if you're not in park or neutral. No idea where it is for a manual.
 

Oneball

CCCUK Member
It's next to the gear selector in the same unit as the switch that prevents you starting the car if you're not in park or neutral. No idea where it is for a manual.

There’s a similar thing on the manuals to prevent starting. I binned it.
 

TimP

CCCUK Member
I like the idea of putting two bulbs in the rear lights for indicator and reversing light. Do you have a picture of how this looks? I was wondering how to achieve an elegant solution for the indicators.
 

johng

CCCUK Member
Tim, I was in a rush and forgot to take photos, but these are the bits I used.
Bulbs
TABEN Extremely Bright 5730 Chipsets White/Amber Dual Color Switchback 1157 BAY15D 1157A 7528 LED Bulbs with Projector Lens for Car Turn Signal Lights and Daytime Running Lights (Pack of 2): Amazon.co.uk: Car & Motorbike
Resistors
Bulb holders
More Information for STANDARD MOTOR PRODUCTS S55

Cost about £30 in all. The resistors need to be wired in parallel with the indicator bulbs and mounted on something metal to act as a heat sink. There's a big beam across the back of my 78 so I just pop riveted them to that. You also need to file a little bit out of the lamp housing to make the bulb holders fit, or you could file a small protrusion off of the bulb holder instead.
 
Top