You are using an out of date browser. It may not display this or other websites correctly.
You should upgrade or use an alternative browser.
You should upgrade or use an alternative browser.
What have YOU being doing or are you planning to do with your Vette?
- Thread starter Daytona Vette
- Start date
Chuffer
CCCUK Member
When I asked if the guy that does most of the work if he could have the car in while we are away for two weeks hols so as not to miss out on events , he said it wouldn`t be in the way as he loves having the car in the body shop .If the shop “likes” your car, your ahead of the game to start with. Always a good sign if the shop shows an interest in the car they are fixing, a little more care is always welcome.
Chuffer
CCCUK Member
Cosmetic Autocare , Letts Road , Northampton . Speak to Gary or Gregg and say I recommended them . I thought your car looked immaculate so surprised you need work done . My issues have moved on a pace after a long chat on the phone yesterday when Greg called me at 8pm !! Now there is service for you !Who are you using Mike? I’d like to get my deck lid re-painted and a couple of other bits looked at but I’m a bit nervous about taking it just anywhere.
My problem is where to finish once started without the paint lacquer coat looking patchy in places . As there are other small areas of cracking in the paint / lacquer on both corners of the nose and front splitter plus one side skirt , and around the lock and handle on drivers door , we are now considering a total strip down to base fibre glass over the winter period and have a fresh full body respray rather than patching here and there . I can help with the strip down and removal of parts on their premises if I want to keep the cost down . Sounds like a plan . In the meantime I will just rub down the damage rear fender edge , filler primer and then use touch up colour so the damage doesn`t look too and bad until you get up close .
Nassau65
CCCUK Member
Sorry to hear that. The only problem I’ve found is that once I’ve had a new paint job on a car, I’m reluctant to use it for fear of damaging/chipping the paint. I know that’s the wrong attitude, but I think many people think the same, and when that first chip appears, it’s a killer.
Chuffer
CCCUK Member
You are so right there , they are lovely to look at but a bugger to paint . Having bonded in rear wing , side skirts and front splitter instead of just bolt on`s makes it even worse to find an edge to work to . .The C3 corvette has always been a difficult car to correct paintwork as it’s so curvy. That’s where a nice straight edge line comes in handy.
Chuffer
CCCUK Member
Hi ,Who are you using Mike? I’d like to get my deck lid re-painted and a couple of other bits looked at but I’m a bit nervous about taking it just anywhere.
I have been having another chat with Greg at Cosmetic Autocare this morning and told him you might be in touch . You can contact him on 07369 214478 if you want to talk about your car . The place doesn`t look much , not big , posh and posy but they did have a new spray / baking shop built a couple of years ago
Letank
CCCUK Member
Thanks Mike 
It’s not that noticeable, but I know it’s there and it really bugs me. It pretty much covers the entire line of the hard top seal and in places it is too deep to polish out. So I think the entire deck lid panel will need re-painting and I’m contemplating some sort of clear film protection over the whole panel to prevent it from happening again.
I assume it’s a well known issue on convertibles since you can actually buy soft top and hard top decklid paint protector strips.
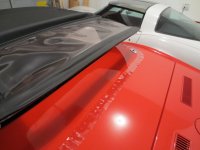
This is what the soft top one looks like, but if you have a hard top one too then that would sit rearward of the soft top one. One of these strips isn’t a great look, two of them will look terrible imo.
99% of it is, but there are some scratches and pitting on the soft top deck lid where the hard top rear seal has been sat.I thought your car looked immaculate so surprised you need work done .
It’s not that noticeable, but I know it’s there and it really bugs me. It pretty much covers the entire line of the hard top seal and in places it is too deep to polish out. So I think the entire deck lid panel will need re-painting and I’m contemplating some sort of clear film protection over the whole panel to prevent it from happening again.
I assume it’s a well known issue on convertibles since you can actually buy soft top and hard top decklid paint protector strips.

This is what the soft top one looks like, but if you have a hard top one too then that would sit rearward of the soft top one. One of these strips isn’t a great look, two of them will look terrible imo.
Nassau65
CCCUK Member
Your soft top seal protector doesn’t look like it’s been fitted properly. Never bothered with them on my 1965, but fitted them to my 60 and 75 convertibles and they fitted perfectly. No air bubbles, lifting or anything. You had to be looking for them to notice them. I must say, that one looks horrible in the photo.
Chuffer
CCCUK Member
I know just what you mean . The Marcos Mantara Spyder I had was afflicted with the same issue . It came with a hard top which I never fitted but you could see a scuff line in the paint along the bottom edge of where the soft top frame .Thanks Mike
99% of it is, but there are some scratches and pitting on the soft top deck lid where the hard top rear seal has been sat.
It’s not that noticeable, but I know it’s there and it really bugs me. It pretty much covers the entire line of the hard top seal and in places it is too deep to polish out. So I think the entire deck lid panel will need re-painting and I’m contemplating some sort of clear film protection over the whole panel to prevent it from happening again.
I assume it’s a well known issue on convertibles since you can actually buy soft top and hard top decklid paint protector strips.
View attachment 16997
This is what the soft top one looks like, but if you have a hard top one too then that would sit rearward of the soft top one. One of these strips isn’t a great look, two of them will look terrible imo.
Forrest Gump
CCCUK regional rep
That's been my excuse for not getting a respray for years. Mines a "driver"Sorry to hear that. The only problem I’ve found is that once I’ve had a new paint job on a car, I’m reluctant to use it for fear of damaging/chipping the paint. I know that’s the wrong attitude, but I think many people think the same, and when that first chip appears, it’s a killer.
Letank
CCCUK Member
The pic was just off Google. I don’t have the protectors on my car, which is probably why the paint is damaged. Tbh the soft top one in that pic doesn’t look like it’s stuck on at all, so I assume it would look better once properly fitted.Your soft top seal protector doesn’t look like it’s been fitted properly. Never bothered with them on my 1965, but fitted them to my 60 and 75 convertibles and they fitted perfectly. No air bubbles, lifting or anything. You had to be looking for them to notice them. I must say, that one looks horrible in the photo.
Since it’s the hard top seal line that I have the scratching on, if I fitted a hard top protector strip now, it would literally be on show all the time (Soft top up or down) because I don’t expect I will ever refit the hard top. Whilst it would be a cheap cover up for the scratches, I think it would actually look worse.
Nassau65
CCCUK Member
Once properly fitted, they hardly show. But if you also fit the Hardtop one as well then of course there’s two and that can look odd.The pic was just off Google. I don’t have the protectors on my car, which is probably why the paint is damaged. Tbh the soft top one in that pic doesn’t look like it’s stuck on at all, so I assume it would look better once properly fitted.
Since it’s the hard top seal line that I have the scratching on, if I fitted a hard top protector strip now, it would literally be on show all the time (Soft top up or down) because I don’t expect I will ever refit the hard top. Whilst it would be a cheap cover up for the scratches, I think it would actually look worse.
They did do factory Color matched ones years ago, not sure if there still produced.
Letank
CCCUK Member
I’ve only ever seen them in clear or matt black vinyl but my car is black so it wouldn’t really matter either way with those options. However, even if they were fitted really well, they would still be more noticeable than the current scratches, which you can only see close up. So I’m of the opinion that I either live with it as is or respray the whole deck lid.Once properly fitted, they hardly show. But if you also fit the Hardtop one as well then of course there’s two and that can look odd.
They did do factory Color matched ones years ago, not sure if there still produced.
antijam
CCCUK Member
Finally got all my brake lines and hoses replaced - and so far no leaks.My car was originally undersealed and there's wet sealing gunk everywhere. It's impossible to see clearly in the area where the leak is evident.
I think I must have flexed the steel line when replacing the rear hose and induced a crack or pinhole in the 50 year old rusty line - anyway the leak is definitely coming from some inaccessible point in the steel line.
You make sensible points, but I think I'm stuck with replacing the lines.
The original lines were installed before the body was fitted so without removing the body, replacement was never going to be quite as easy - but I've encountered worse jobs on the C3 (sawing off the trailing arms for instance). The line from the master cylinder to the rear brakes runs along inner face of the drivers side chassis rail and while I would normally raise the car on the QuickJack to work underneath, this is one job where the access is easier with the car up on jack stands. I bought a full kit of replacement lines, clips, blocks and hoses in original steel rather than stainless.
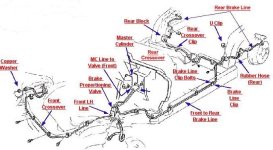
The big plus was they were available off the shelf, which stainless were not and although the new lines are preformed, some manipulation to get them fitted was going to be necessary and mild steel is a lot easier to work with than stainless; also my original lines have lasted 50+ years and I'd expect the replacements to do the same. Either way, I won't be around to find out.
I disconnected the lines from the calipers and pumped out fluid before tackling the replacement. I resisted the temptation to cut the old lines out in pieces, since if they didn't come out in one piece, the new ones were unlikely to go in. The long front to rear line was the trickiest to remove and fit; as it runs along the chassis rail it passes through a small gap where a cross member joins the rail and it's then cranked up at both ends, at the front to connect to the proportioning valve and at the back to the LH block and hose connection. With the old line out and the new ready for fitting ....
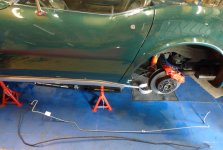
I located the leak that started all this....

I fitted a new rear block to the line before installing as access for connection is very limited when in place. The rear crossover install (with new clips) was straightforward followed by new hoses and hard lines to the calipers. To fit the front crossover the two fan cowl support brackets had to be removed......
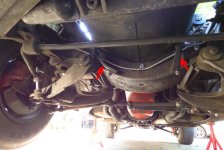
..... to allow the line to pass behind them, then new front hoses with copper washers ( I reused the originals after annealing) were fitted.
The last connections were made inside the engine bay at the master cylinder and the proportioning valve (it's not actually a proportioning valve insofar as it doesn't differentiate pressure to the front and rear brakes. It's a shuttle valve which in the case of loss of pressure to one half of the system shuts that part off ). I adjusted the hard lines and trial fitted those to the master cylinder to ensure that quick connection could be made after I had filled and bled the cylinder. It's very important to ensure that the lines are properly aligned with their connection points since it's very easy to cross thread the unions if they're not. The connection to the bottom of the proportioning valve - connecting the line arrowed below....
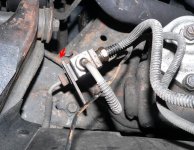
...is practically impossible to break or torque up without a crowsfoot spanner on long extension bar - fortunately I had one.....
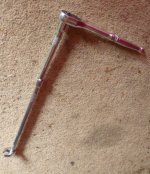
Incidentally, the unions on the new lines were correctly threaded but some of the hex's were smaller than the originals, which had me fooled for a while.
I cut up and reformed the old hard lines from the master cylinder to the valve to make bleed tubes and fitted these to the cylinder before refilling with DOT 3 fluid and pressing the pedal to force out the air.
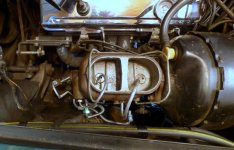
With the cylinder bled I removed the bleeders and reconnected the system lines....
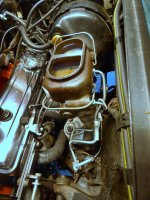
Last job was to expel air from the whole system, which fortunately was done easily, although rather slowly, by a gravity bleed at the calipers....
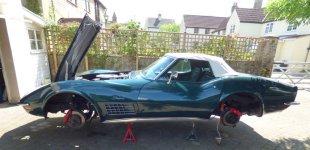
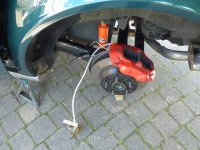
With a nice hard pedal achieved and after a final check of all connections for leaks, I'm back on the road! Hooray!
Last edited:


