What have you done today ?

Chuffer

CCCUK Member
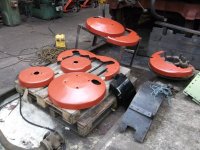
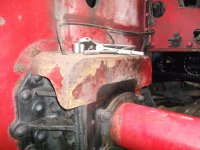
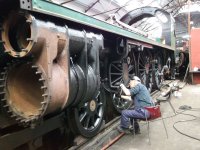
What have I been doing today ? Well I have have been cleaning down a pair of Big Blocks with a heavy duty electric wire brush and then applying copious amounts of heat resistant combined primer /undercoat . Not on L88 Big Blocks though , something a whole lot bigger !! We are really cracking on again with `Sir Lamiels ` overhaul after the delays caused by the asbestos debacle . Each of the two cylinders is 574 cubic inches displacement which rather puts a 427 in the shade . :LOL: That paint sure gives off some high octane fumes and I was feeling high as a kite by end of the day . My buddy Bill was fastidiously needle gunning the outer faces of cast iron hanger brackets for the massive leaf springs on the three driving wheel axles whilst i worked on the cylinders . The spring hangers can only be accessed through the gaps between the wheel spokes . Bill is real character and an ex British Railways steam loco fireman and driver from the 1950`s and still puts in a good shift at the age of 83 !! The front and rear cladding for the piston valve and the cylinder covers were also degreased and sanded down and given a coat of red oxide primer . The main cylinder block DSCF3434.JPGDSCF3435.JPGDSCF3436.JPGcladding panels will be the next job .
 

antijam

CCCUK Member
My oh my , you have jogged some memories . Those vast tomes were all we could turn to in the those pre internet days !!!

We perhaps sometimes rather take for granted how the internet has revolutionised almost everything in life - including classic car restoration and maintenance. I still remember the hours spent poring over Exchange and Mart and similar mags, the days spent at autojumbles, and the hours with - yes, The Yellow Pages and the phone in search of that elusive car or part.
Harold Macmillan's words of 1957, "You've never had it so good" should still ring true with the younger generation of car enthusiasts. πŸ™‚
 

Mr. Cricket

Committee Member
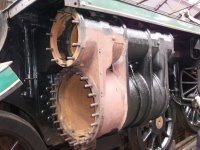
What have I been doing today ? Well I have have been cleaning down a pair of Big Blocks with a heavy duty electric wire brush and then applying copious amounts of heat resistant combined primer /undercoat . Not on L88 Big Blocks though , something a whole lot bigger !! We are really cracking on again with `Sir Lamiels ` overhaul after the delays caused by the asbestos debacle . Each of the two cylinders is 574 cubic inches displacement which rather puts a 427 in the shade . :LOL: That paint sure gives off some high octane fumes and I was feeling high as a kite by end of the day . My buddy Bill was fastidiously needle gunning the outer faces of cast iron hanger brackets for the massive leaf springs on the three driving wheel axles whilst i worked on the cylinders . The spring hangers can only be accessed through the gaps between the wheel spokes . Bill is real character and an ex British Railways steam loco fireman and driver from the 1950`s and still puts in a good shift at the age of 83 !! The front and rear cladding for the piston valve and the cylinder covers were also degreased and sanded down and given a coat of red oxide primer . The main cylinder block View attachment 25908cladding panels will be the next job .
Is Bill deaf by any chance? Good on him keeping at it at 83
 

antijam

CCCUK Member
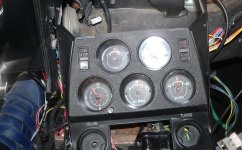
Finally got my '71 central instrument cluster removed (yet again!) ......

View attachment 25899

...and the two duff instruments removed.......

View attachment 25898
I'm going to lie down in a darkened room for a few days before attempting the replacement :sick:
My garage is a little restricting on access space and while there was just enough room to remove the panel it's going to be much easier to refit it with the car outside. I need a couple of days of fine weather - come on spring, what are you waiting for?

Got my instrument cluster back together with the new oil pressure gauge and ammeter. I've replaced the oil line between the engine block and the gauge with a new original small bore plastic line and new end fittings and these type of connections have been known to leak. Rather than find oil dripping down inside the car after I've fitted everything back in place I made the oil and all the electrical connections to the gauge cluster and with the panel sitting loosely in place I fired up the car to checked that everything worked and there were no oil leaks.
P1390083.JPG
Oil pressure now varies with engine speed, which it never did with the old gauge before it failed completely and now shows a healthier 45psi rather than a constant 30psi. The old gauge must have been sticking before giving up the ghost completely. New ammeter shows a positive charge on startup and all the instrument lamps that I chose to replace with led's work fine. My replacement quartz clock has a disconcerting habit of doing nothing once power is reconnected before finally running backwards! Resetting the time eventually gets it to behave properly.
A check behind the panel reveals the oil gauge connection to be dry, so all I have to do now is steel myself to fiddle everything back together again! 😟
 

Chuffer

CCCUK Member
Got my instrument cluster back together with the new oil pressure gauge and ammeter. I've replaced the oil line between the engine block and the gauge with a new original small bore plastic line and new end fittings and these type of connections have been known to leak. Rather than find oil dripping down inside the car after I've fitted everything back in place I made the oil and all the electrical connections to the gauge cluster and with the panel sitting loosely in place I fired up the car to checked that everything worked and there were no oil leaks.
View attachment 25922
Oil pressure now varies with engine speed, which it never did with the old gauge before it failed completely and now shows a healthier 45psi rather than a constant 30psi. The old gauge must have been sticking before giving up the ghost completely. New ammeter shows a positive charge on startup and all the instrument lamps that I chose to replace with led's work fine. My replacement quartz clock has a disconcerting habit of doing nothing once power is reconnected before finally running backwards! Resetting the time eventually gets it to behave properly.
A check behind the panel reveals the oil gauge connection to be dry, so all I have to do now is steel myself to fiddle everything back together again! 😟
Joy unconfined !! Great to hear you are making progress . (y)
 

Mr. Cricket

Committee Member
Got my instrument cluster back together with the new oil pressure gauge and ammeter. I've replaced the oil line between the engine block and the gauge with a new original small bore plastic line and new end fittings and these type of connections have been known to leak. Rather than find oil dripping down inside the car after I've fitted everything back in place I made the oil and all the electrical connections to the gauge cluster and with the panel sitting loosely in place I fired up the car to checked that everything worked and there were no oil leaks.
View attachment 25922
Oil pressure now varies with engine speed, which it never did with the old gauge before it failed completely and now shows a healthier 45psi rather than a constant 30psi. The old gauge must have been sticking before giving up the ghost completely. New ammeter shows a positive charge on startup and all the instrument lamps that I chose to replace with led's work fine. My replacement quartz clock has a disconcerting habit of doing nothing once power is reconnected before finally running backwards! Resetting the time eventually gets it to behave properly.
A check behind the panel reveals the oil gauge connection to be dry, so all I have to do now is steel myself to fiddle everything back together again! 😟

Great job (y)
 

CaptainK

CCCUK Member
For me this weekend was gardening as the sun was out. Digging over some of the raised beds, mixing in compost etc. Then planting out a fair few green beans, tomatoes, cucumbers, sweet corn, courgettes, and pumpkins. All been growing from seeds for a while, starting a propagator, into bigger pots and some of them now big enough to plant out. Got a ton more to plant out later, as they are too small to go out now.
 

Chuffer

CCCUK Member
For me this weekend was gardening as the sun was out. Digging over some of the raised beds, mixing in compost etc. Then planting out a fair few green beans, tomatoes, cucumbers, sweet corn, courgettes, and pumpkins. All been growing from seeds for a while, starting a propagator, into bigger pots and some of them now big enough to plant out. Got a ton more to plant out later, as they are too small to go out now.
Green fingers , car mechanic fingers and model railway fingers ! Who said men aren`t multi talented ??? :LOL:
 

CaptainK

CCCUK Member
Green fingers , car mechanic fingers and model railway fingers ! Who said men aren`t multi talented ??? :LOL:
Did you know most men can actually multitask as well? We can drink beer (granted non alcoholic for me), watch TV, AND shout at the TV all at the same time, whilst also simultaneously ignoring the missus. Now if that isn't multitasking, then I don't know what is :ROFLMAO:
 

Chuffer

CCCUK Member
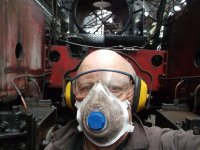
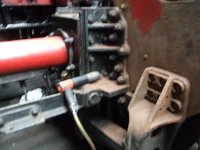
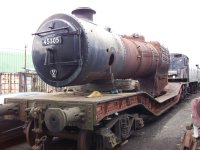
Another day spent playing in the BIG TOY box , and no , the Martians haven`t landed it`s just yours truly all dressed up for a long needle gunning session . That was after first unbolting and removing the axle box protector covers . All this was on the inside faces of the Stanier Black 5 number 45305 `s frames whilst two of my mates were busy gloss painting the wheels on Sir Lamiel that keeps company with 45305 . Both locos are in our tender loving care .We are awaiting the boiler inspectors visit to assess the amount of work needed 45305 `s boiler that currently sits outside the workshop on a low loader wagon . Fingers crossed for a good outcome as that will speed the job up no end . In the meantime I think one more glass of wine might just take the tingling away from my hands and arms after a few hours of needle gunning . :LOL:
The final treat of the day was spotting a Black C2 fixed head with side pipes on my way home down the A5 through Weedon . Only a quick glimpse but I think it was local club member Rodney Joffe in his Big Block who lives in that area . (y)DSCF3440.JPGDSCF3443.JPGDSCF3444.JPGDSCF3421.JPG
 

Chuffer

CCCUK Member
I can you tell you what I haven`t done today and this go to an Americana meet at Gasoline Juice in Weedon Bec , Northants . A couple of other local BBNC region members were gonna go too put weather is pants yet again so knocked that one on the head . :rolleyes:
 

antijam

CCCUK Member
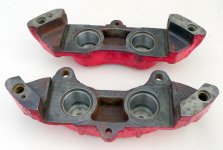
When checking the car's fluids the other day I notice the level in the rear well of the brake master cylinder has fallen slightly. Check rear calipers for signs of a leak and sure enough there's a weep from the driver's side. So I take off the caliper, split it and remove the dust seals and pistons. My calipers are still original Delco items but the strip down reveals that it has at some time been fitted with stainless steel sleeves .......
P1390090.JPG
......which is good news - but the seals have been replaced with the original type lip seals.....
P1390092.JPG
...which is perhaps not so good. Over time these lip seals have been shown to be prone to leakage, particularly in a lightly used car and they can also have a propensity to 'pump air' into the caliper leading to a spongy brake pedal. The consensus on most 'Vette forums seems to suggest it would be wise to replace these with 'O' ring seals.

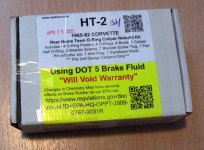
So, I buy an 'O' ring caliper rebuild kit.....

P1390097.JPG
...which is pretty comprehensive, containing everything you might need. As the 'dayglo' warning on the box points out, if you've converted to DOT 5 silicone brake fluid, this is not the kit for you. I presume though that glycol based DOT 5.1 would be OK.

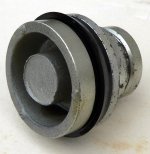
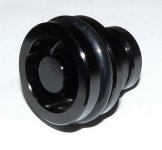
The stainless bores are in good condition and a light polish is all that's needed to clean them up, so I fit the new seal kit and re-assemble the caliper. Note that the new pistons are not interchangeable with the lip seal type. That's probably why they're anodised black rather than the silver of the originals - so you don't confuse them.

P1390096.JPG
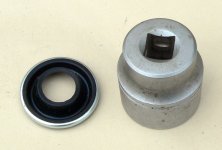
By good luck I discover my 1ΒΌ" socket is exactly the right size to tap the sealing boots home..... :)

P1390098.JPG

Incidentally, if anyone is thinking of doing the same conversion, nicely detailed instructions can be downloaded here.

I've bolted the caliper back on the car, bled the brakes and so far no apparent leaks. As soon as it stops raining, it's off for a test drive. :)
 

antijam

CCCUK Member
So do you know how long the lip seals actually lasted for?
No. I bought the car in early 2019 and this is the first time I've had the caliper apart - so at least five years. I had noticed sponginess in the pedal over the past few years - corrected by re-bleeding the brakes - so it may have been sucking air for some time. I actually bought two rebuild kits on the assumption that the demise of one caliper is quite likely to be followed by the other.
 

Chuffer

CCCUK Member
When checking the car's fluids the other day I notice the level in the rear well of the brake master cylinder has fallen slightly. Check rear calipers for signs of a leak and sure enough there's a weep from the driver's side. So I take off the caliper, split it and remove the dust seals and pistons. My calipers are still original Delco items but the strip down reveals that it has at some time been fitted with stainless steel sleeves .......
View attachment 26071
......which is good news - but the seals have been replaced with the original type lip seals.....
View attachment 26072
...which is perhaps not so good. Over time these lip seals have been shown to be prone to leakage, particularly in a lightly used car and they can also have a propensity to 'pump air' into the caliper leading to a spongy brake pedal. The consensus on most 'Vette forums seems to suggest it would be wise to replace these with 'O' ring seals.

So, I buy an 'O' ring caliper rebuild kit.....

View attachment 26073
...which is pretty comprehensive, containing everything you might need. As the 'dayglo' warning on the box points out, if you've converted to DOT 5 silicone brake fluid, this is not the kit for you. I presume though that glycol based DOT 5.1 would be OK.

The stainless bores are in good condition and a light polish is all that's needed to clean them up, so I fit the new seal kit and re-assemble the caliper. Note that the new pistons are not interchangeable with the lip seal type. That's probably why they're anodised black rather than the silver of the originals - so you don't confuse them.

View attachment 26074
By good luck I discover my 1ΒΌ" socket is exactly the right size to tap the sealing boots home..... :)

View attachment 26075

Incidentally, if anyone is thinking of doing the same conversion, nicely detailed instructions can be downloaded here.

I've bolted the caliper back on the car, bled the brakes and so far no apparent leaks. As soon as it stops raining, it's off for a test drive. :)
Sounds like a win , win all round to me . (y)
 

mickn

CCCUK Member
When checking the car's fluids the other day I notice the level in the rear well of the brake master cylinder has fallen slightly. Check rear calipers for signs of a leak and sure enough there's a weep from the driver's side. So I take off the caliper, split it and remove the dust seals and pistons. My calipers are still original Delco items but the strip down reveals that it has at some time been fitted with stainless steel sleeves .......
View attachment 26071
......which is good news - but the seals have been replaced with the original type lip seals.....
View attachment 26072
...which is perhaps not so good. Over time these lip seals have been shown to be prone to leakage, particularly in a lightly used car and they can also have a propensity to 'pump air' into the caliper leading to a spongy brake pedal. The consensus on most 'Vette forums seems to suggest it would be wise to replace these with 'O' ring seals.

So, I buy an 'O' ring caliper rebuild kit.....

View attachment 26073
...which is pretty comprehensive, containing everything you might need. As the 'dayglo' warning on the box points out, if you've converted to DOT 5 silicone brake fluid, this is not the kit for you. I presume though that glycol based DOT 5.1 would be OK.

The stainless bores are in good condition and a light polish is all that's needed to clean them up, so I fit the new seal kit and re-assemble the caliper. Note that the new pistons are not interchangeable with the lip seal type. That's probably why they're anodised black rather than the silver of the originals - so you don't confuse them.

View attachment 26074
By good luck I discover my 1ΒΌ" socket is exactly the right size to tap the sealing boots home..... :)

View attachment 26075

Incidentally, if anyone is thinking of doing the same conversion, nicely detailed instructions can be downloaded here.

I've bolted the caliper back on the car, bled the brakes and so far no apparent leaks. As soon as it stops raining, it's off for a test drive. :)
Probably some time in June then ;)
 

Roscobbc

Moderator
John.....over the last couple of days I have been checking out my C3 for the coming season. I removed each of the wheels in turn, inspecting the tyres for damage and deterioration (and giving the wheels a thorough polish) and then checking the calipers etc for leaks.
l replaced the original type lip seals perhaps 18/20 years ago with an 'O' ring kit. It's still the same kit.....no leaks to date. The general advice if using the lip seal pistons is to replace brake fluid every couple of years. No need with 'O' ring seals......but my car is kept in a dry garage attached and marginally warmed by the house so the typical condensation issue that may effect other owners isn't a problem.
When choosing to use the 'O' ring seals I did need to thoroughly and carefully clean out the previously stainless sleeved calipers using ultra fine steel wool and Crocus paper. Think of the caliper bores like honing engine cylinder bores.....and only clean them using a radial movement, removing any high spots as seen in Antijam photo on the lower caliper. No need to split caliper halfs if the're not leaking.
p1390090-jpg.26071

Perhaps finish off with a midly abrasive compound like T Cut before an intensive clean with brake cleaner before flushing system through a couple of times with new mineral fluid.
All a bit over the top perhaps but the system has been good for a long time!
Its important to remember that any moisture caused by condensation within the braking system will eventually be absorbed by the brake fluid (which is hygroscopic) this in turn lowers the boiling point of the fluid risking it boiling during heavy use, creating brake 'fade.
Ah ha! say some - "I'll use silicon fluid instead, it isn't hygroscopic". True enough but that moisture is still in the braking system and now be tiny globules which again will possibly boil-off under heavy breaking, potentially causing early brake fade. Worst thing is that any moisture present in the system will cause rust to form on the cast surfaces of the master cylinder and calipers and then be suspended in the brake fluid accelerating eventual issues with the system.
 
Last edited:

johng

CCCUK Member
Ross/Antijam, I asked because I rebuilt my calipers about 4 years ago with lip seals. I've seen the reports that they don't last long and was interested to see how long they have lasted for others. I did buy new brake fluid to do a flush through last year, but haven't actually got around to it yet! Must raise that up the priority order.
 

Chuffer

CCCUK Member
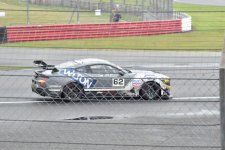
What have I done today apart from getting wet and freezing my butt off at Silverstone Circuit ? Went to the British GT Championships 500 three hour endurance race to watch a big grid of 40 hairy arsed Mercs , BMW`s McClarens , Lamborghini , Aston Martins and Mustang GT`s dicing it out in rather challenging conditions . Just a shame there were no Corvettes in the mix . At least the sound of the Mustangs really ` getting on the power ` out of Brooklands was a superb contrast to the wailing and screaming of the Lambo`s and McClaren`s etc . Although the Astons`s sounded good on full chat ! The day dawned with heavy rain , then light rain , then cold and no rain , then cold with rain !! Bloody freezing in fact . There were supporting races too in the Ginetta series but the main event GT race was blighted with two full course yellow flags in the first hour due to several trips into the kitty litter and then a full red flag on the stroke of hour two due to something more serious . At which point the wife and I got fed up of freezing our bits off in the BRDC grandstand and headed home . Two other CCCUK members turned out too so it was a tale of `Three Corvettes`, ( not the book by Nicholas Montseratt about the WW2 exploits of warships on the Atlantic convoys ) although I doubt the North Atlantic was much colder and wetter than Silverstone today !! :(
PS . The positioning of LDV 515V was not down to my bad parking , I think the marshal just decided the Vette needed more space than anyone else . (y)DSC_4085.JPGDSC_4030.JPGDSC_4032.JPGDSC_4077.JPGDSC_4043.JPGDSC_4073.JPGDSC_4062.JPG
 
Top