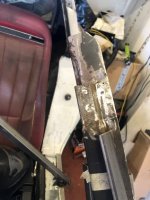
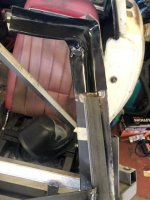
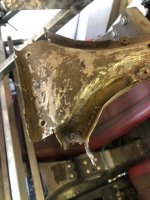
Thanks for the tip. Mine seems to be okComing along well.
Check the new top rail pressing is straight. Mine was twisted longitudinally.
You are using an out of date browser. It may not display this or other websites correctly.
You should upgrade or use an alternative browser.
You should upgrade or use an alternative browser.
72 Corvette - Restoration Updates
- Thread starter TimP
- Start date
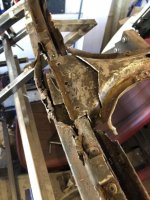
It took a little while to figure how to get the new top frame attached to the rest of the car. The fact that the old top frame was really corroded and full of holes did not help but I finally came up with the plan which requires a rather brutal cut to the T-Top centre frame. After carefully measuring and marking up the required cut points half a dozen times I finally took aim with a Dremel and cut off part of the top section. A triangle was cut so that the repair weld will be a little stronger. It's a llittle rusty inside but not bad considering and has in fact cleaned up pretty well.
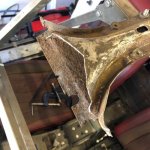
I fitted the old top frame to check fit ....
... and then fitted the new top frame for the first time. Not perfect but not far off - a little fettling should see this fit quite nicely. The centre section is about an eight of an inch too high - I seem to remember it sat up a little when I popped it off the old top frame, so maybe my jig/brace was perhaps a little too snug (or perhaps the hot weather has lengthened those long brace sections?). It can easily be clamped to join properly but I would rather it sat right without being forced.
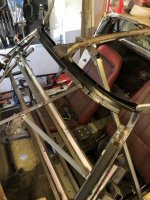
This week I will continue to refurbish the T-Top join area and replace the spot weld tabs that hold the centre section to the top frame as they are pretty mangled. I also need to get everything sitting square and then fettle the corner pieces so that they can be plug welded in the appropriate places.


I fitted the old top frame to check fit ....

... and then fitted the new top frame for the first time. Not perfect but not far off - a little fettling should see this fit quite nicely. The centre section is about an eight of an inch too high - I seem to remember it sat up a little when I popped it off the old top frame, so maybe my jig/brace was perhaps a little too snug (or perhaps the hot weather has lengthened those long brace sections?). It can easily be clamped to join properly but I would rather it sat right without being forced.

This week I will continue to refurbish the T-Top join area and replace the spot weld tabs that hold the centre section to the top frame as they are pretty mangled. I also need to get everything sitting square and then fettle the corner pieces so that they can be plug welded in the appropriate places.
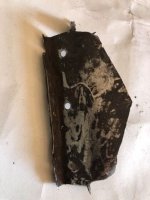
As previously mentioned I had cut out the end of the upper T-Top centre section in order to removed the windscreen upper frame. There was quite a bit of corrosion on it and the tabs where this piece is welded to the upper frame had all but disappeared....
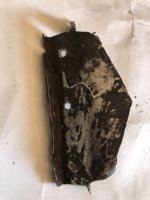
Two new metals inserts were welded onto the ends of the 'kinked ' section (on the left of the photo above) and the three rivet holes were welded up as they need to be moved forward for the new upper frame. Two new tabs were attached replacing the two stubs (top and bottom). Here's a photo of the test fit where you can see the new tabs without and then with the new rivet holes drilled.
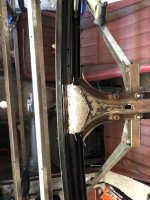
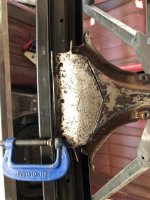
The two corner pieces needed quite a bit of persuasion to get somewhere close to fitting and there were large gaps between the corner piece and the upper frame on both sides as the curve radii were a little different. An incision was made with a Dremel in each corner and then the separated sections were bent to fit. A small piece of sheet metal was added in the gap and then welded up. A die grinder (another recent purchase which I couldn't have done without) was used to clean up the weld afterwards.
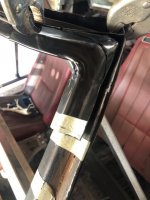
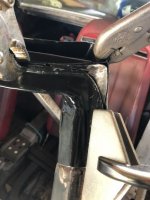
The gap was bigger on this side. Strangely the passenger side side tab was way too small and did not extend the full width of the side frame, which is necessary to give room for a reasonable size plug weld. This was extended to give the full width.
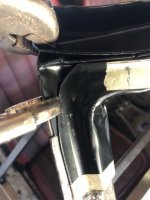
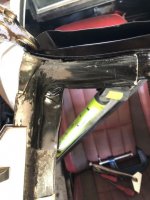
Everything seems to fit pretty well now - the 'steel windshield' jig I made earlier fits really nicely and all four tabs sit flush with frame so I think the fit is pretty close.
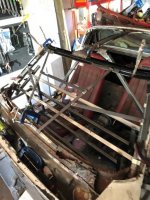
Next steps are to check the new measurements with the old ones and then identify the places that need to be drilled for the plug welds. Then through weld primer, tack weld, check the fit with a real windscreen (and the T-Tops) and then hopefully complete the welds. More painting and then move onto the challenges of the lower frame. Onwards and upwards.....
A handy hint for anybody thinking about doing this job - you can't have too many clamps!

Two new metals inserts were welded onto the ends of the 'kinked ' section (on the left of the photo above) and the three rivet holes were welded up as they need to be moved forward for the new upper frame. Two new tabs were attached replacing the two stubs (top and bottom). Here's a photo of the test fit where you can see the new tabs without and then with the new rivet holes drilled.


The two corner pieces needed quite a bit of persuasion to get somewhere close to fitting and there were large gaps between the corner piece and the upper frame on both sides as the curve radii were a little different. An incision was made with a Dremel in each corner and then the separated sections were bent to fit. A small piece of sheet metal was added in the gap and then welded up. A die grinder (another recent purchase which I couldn't have done without) was used to clean up the weld afterwards.


The gap was bigger on this side. Strangely the passenger side side tab was way too small and did not extend the full width of the side frame, which is necessary to give room for a reasonable size plug weld. This was extended to give the full width.


Everything seems to fit pretty well now - the 'steel windshield' jig I made earlier fits really nicely and all four tabs sit flush with frame so I think the fit is pretty close.

Next steps are to check the new measurements with the old ones and then identify the places that need to be drilled for the plug welds. Then through weld primer, tack weld, check the fit with a real windscreen (and the T-Tops) and then hopefully complete the welds. More painting and then move onto the challenges of the lower frame. Onwards and upwards.....
A handy hint for anybody thinking about doing this job - you can't have too many clamps!
Mad4slalom
Well-known user
I dont know what your background is Tim , but you are taking some major structural stuff in your stride , and you crack on at a good pace. Great job , this will be a very special car when finished. 
Thanks! Very nasty to be honest - I have deliberately not touched the lower end of the windscreen side frames as they are quite rusty particularly on the passenger side where it is badly perforated and probably doesn't have much residual strength - hence the time taken to make a brace to keep things steady whilst the upper frame is being replaced.Top end is looking good Tim, but the bottom looks nasty. Has the outer corner panel just disintegrated or have you already cut it out? How are you planning to replace it?
Good Question! Although I know what needs to be done I have deliberately left the 'how am I planning to replace it?' thought until the last possible moment .... obviously one option to get this done properly (particularly by someone inexperienced like me) is to take the front glassfibre moulding off so that I can get to all the parts that need to be replaced/refurbished. However, once the upper frame is done (not too long now) I will work out a plan for the rest of the windscreen frame and hinge posts (which mainly are in good shape).
Another good question! The hinge or A post is in reasonably good shape but the birdcage rocker (I think that's the right term) than runs under the hinge post to the hoop at the back of the car is in pretty poor shape (it's a theme with this carHow’s the bit at the bottom that’s covered in fibreglass?
Not sure about in my stride but slowly, one bit a time, I seem to be making progress. Background: Mechanical Engineering at Brighton Poly (any Polymoba out there?) back in the eighties and then a career in IT and project management in airlines and healthcare. Most of which is not particularly relevant for Corvette rebuilding however, as in most jobs, a lot of my time was spent problem solving which comes in handy (big time) on a restoration like thisI dont know what your background is Tim , but you are taking some major structural stuff in your stride , and you crack on at a good pace. Great job , this will be a very special car when finished.
Mad4slalom
Well-known user
Very impressive TimNot sure about in my stride but slowly, one bit a time, I seem to be making progress. Background: Mechanical Engineering at Brighton Poly (any Polymoba out there?) back in the eighties and then a career in IT and project management in airlines and healthcare. Most of which is not particularly relevant for Corvette rebuilding however, as in most jobs, a lot of my time was spent problem solving which comes in handy (big time) on a restoration like this
It's about time I posted something so here's an update on the windscreen frame. With the summer weather (early in the month anyway) with us, car time has conflicted with many other things like garden upkeep, jobs on the house, footie etc. Not just chores but nice things too. Deferred birthday parties for example: enjoying the company of friends and thinking back to when someone would blow on the cake before you ate it.....
However, progress has been made. The windscreen frame pieces have been assembled, taken apart, adjusted, re-assembled etc. too many times to count to get everything to fit correctly. I had made a metal frame to simulate the windscreen and this was very useful but not quite as reassuring as using the real thing. So the old screen was cleaned and pressed into service to check the fit. Fortunately it did. The measurements I had taken earlier were also checked to make sure nothing had moved in the interim. I also replaced the appropriate brackets and fitted the T-Tops just in case that revealed anything else untoward.
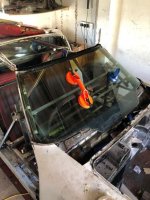
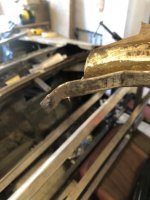
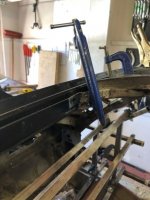
New tabs were welded on the T-Top brace to upper frame connection on both sides to provide a stronger attachment. Drivers side....
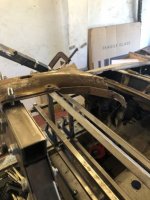
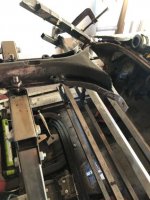
and passenger...
Then the positions of the puddle welds was checked on both sides...
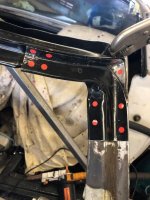
... before drilling and cleaning up the holes. I ended up increasing the diameter of most of these holes to increase the weld area/strength.
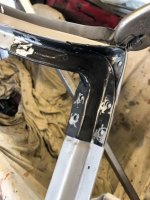
Much welding and grinding later, all was complete and looking ok. Gratifyingly, the stainless steel T-Top brace cover dropped on to the new frame with just the slightest pressure.
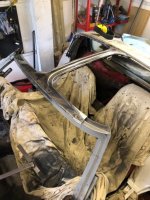
The final (for the time being) task was to coat the new metal with etch primer to keep the rust at bay whilst I attend to the lower windscreen frame. There are quite a few trim and other holes to be drilled in the upper windscreen frame at some point. Seam sealer will probably be used to aid rust prevention and then top coat. I'm assuming the birdcage was painted black (can anybody confirm?) but I will probably wait until the lower frame is finished to do this.
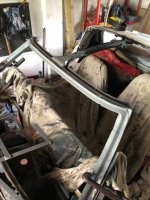
Must admit to being quite pleased with the result - it looks and feels really solid. It's taken two months to make the jigs, remove the old parts and fit the new - I'm sure somebody more experienced would have done it a lot quicker. However, it's also been good fun without too many traumas.
There's still lots to do - the front glass fibre moulding needs to be removed next so that I can repair the lower windscreen frame and hinge posts. All required parts are in my workshop, so hammer and chisel in hand I will try and split the required joins over the next week or two. I have done quite a bit of research on this (as I tend to do before starting anything) and it looks fairly daunting. Worse still, I can already see that someone has been there before.... Onwards and upwards.
However, progress has been made. The windscreen frame pieces have been assembled, taken apart, adjusted, re-assembled etc. too many times to count to get everything to fit correctly. I had made a metal frame to simulate the windscreen and this was very useful but not quite as reassuring as using the real thing. So the old screen was cleaned and pressed into service to check the fit. Fortunately it did. The measurements I had taken earlier were also checked to make sure nothing had moved in the interim. I also replaced the appropriate brackets and fitted the T-Tops just in case that revealed anything else untoward.

New tabs were welded on the T-Top brace to upper frame connection on both sides to provide a stronger attachment. Drivers side....


and passenger...


Then the positions of the puddle welds was checked on both sides...

... before drilling and cleaning up the holes. I ended up increasing the diameter of most of these holes to increase the weld area/strength.

Much welding and grinding later, all was complete and looking ok. Gratifyingly, the stainless steel T-Top brace cover dropped on to the new frame with just the slightest pressure.

The final (for the time being) task was to coat the new metal with etch primer to keep the rust at bay whilst I attend to the lower windscreen frame. There are quite a few trim and other holes to be drilled in the upper windscreen frame at some point. Seam sealer will probably be used to aid rust prevention and then top coat. I'm assuming the birdcage was painted black (can anybody confirm?) but I will probably wait until the lower frame is finished to do this.

Must admit to being quite pleased with the result - it looks and feels really solid. It's taken two months to make the jigs, remove the old parts and fit the new - I'm sure somebody more experienced would have done it a lot quicker. However, it's also been good fun without too many traumas.
There's still lots to do - the front glass fibre moulding needs to be removed next so that I can repair the lower windscreen frame and hinge posts. All required parts are in my workshop, so hammer and chisel in hand I will try and split the required joins over the next week or two. I have done quite a bit of research on this (as I tend to do before starting anything) and it looks fairly daunting. Worse still, I can already see that someone has been there before.... Onwards and upwards.
Mad4slalom
Well-known user
Absolutely stirling work Tim, that must have been the worst job of the whole restoration surely?It's about time I posted something so here's an update on the windscreen frame. With the summer weather (early in the month anyway) with us, car time has conflicted with many other things like garden upkeep, jobs on the house, footie etc. Not just chores but nice things too. Deferred birthday parties for example: enjoying the company of friends and thinking back to when someone would blow on the cake before you ate it.....
However, progress has been made. The windscreen frame pieces have been assembled, taken apart, adjusted, re-assembled etc. too many times to count to get everything to fit correctly. I had made a metal frame to simulate the windscreen and this was very useful but not quite as reassuring as using the real thing. So the old screen was cleaned and pressed into service to check the fit. Fortunately it did. The measurements I had taken earlier were also checked to make sure nothing had moved in the interim. I also replaced the appropriate brackets and fitted the T-Tops just in case that revealed anything else untoward.
View attachment 12097
New tabs were welded on the T-Top brace to upper frame connection on both sides to provide a stronger attachment. Drivers side....
View attachment 12098 View attachment 12099
and passenger...
View attachment 12100 View attachment 12101
Then the positions of the puddle welds was checked on both sides...
View attachment 12102
... before drilling and cleaning up the holes. I ended up increasing the diameter of most of these holes to increase the weld area/strength.
View attachment 12103
Much welding and grinding later, all was complete and looking ok. Gratifyingly, the stainless steel T-Top brace cover dropped on to the new frame with just the slightest pressure.
View attachment 12104
The final (for the time being) task was to coat the new metal with etch primer to keep the rust at bay whilst I attend to the lower windscreen frame. There are quite a few trim and other holes to be drilled in the upper windscreen frame at some point. Seam sealer will probably be used to aid rust prevention and then top coat. I'm assuming the birdcage was painted black (can anybody confirm?) but I will probably wait until the lower frame is finished to do this.
View attachment 12105
Must admit to being quite pleased with the result - it looks and feels really solid. It's taken two months to make the jigs, remove the old parts and fit the new - I'm sure somebody more experienced would have done it a lot quicker. However, it's also been good fun without too many traumas.
There's still lots to do - the front glass fibre moulding needs to be removed next so that I can repair the lower windscreen frame and hinge posts. All required parts are in my workshop, so hammer and chisel in hand I will try and split the required joins over the next week or two. I have done quite a bit of research on this (as I tend to do before starting anything) and it looks fairly daunting. Worse still, I can already see that someone has been there before.... Onwards and upwards.
Thanks!
Not sure about the worst - probably this has been the most challenging and has required the most planning and the most attention to detail of what i have done so far. Thinking about it now, drilling out all the rivets from the 4 brake rotors is probably the job I would least like to do again. 'Challenging' I am Ok with but repetitive stuff, even if quite straightforward, is something I really struggle with.
In all honesty I think the most difficult bit is yet to come - the lower windscreen frame is in very poor condition and it is going to require a lot of digging to provide the room to repair it. The top of the passenger hinge post is also very poor - to the point where the lower windscreen frame is actually disconnected. However, now that the new top frame is securely in place I have something (together with the jig I built) that is a good solid reference point to build on.
Baron von Del Boy
Well-known user
Must admit to being quite pleased with the result.
And so you should be.. phenomenal work.
That's brilliant - thanks!The visible bits of the birdcage were black and in some places body colour there’s a change around the bottom of the windscreen frame on the door/a pillar. Non visible stuff is anti corrosion green.
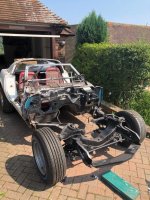
Now you see it ..
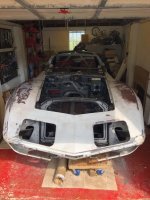
Now you don't...
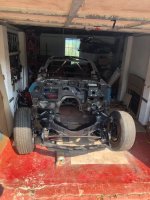
It took three or four days of concentrated effort to get the front fibreglass separated from the bulkhead. A little damage has been done bit nothing that can't be repaired and I'm quite pleased that it didn't go horribly wrong. It's not something I would say was good fun - disaster is only one step away at all times.
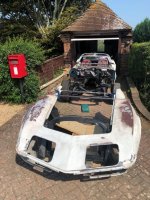
I built a dolly out of the trolley that I made for the gearbox so that I could move it round the house reasonably easily. It's not heavy even with the radiator support still attached (to give some rigidity) but it is a bit unwieldy. With my wife's help I lifted the front off the car and laid it down carefully on the dolly and fixed it with cable ties to stop it falling off. It's now sitting under cover at the back of the house and will be attended to in due course. The thin strip of fibreglass at the back of the clip is very vulnerable now that it isn't attached to anything and a steel brace was clamped firmly to the fibreglass to give it some support.
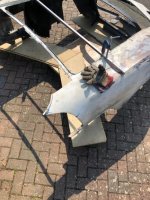
Next steps will be to examine the bulkhead in detail and see what I need to do to enable access to the bits of the birdcage that need to be replaced or repaired.
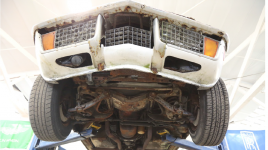
It may seem quite odd that 2 years into a rebuild I am still ripping bits of the car but having a quick look to see where the project started from (this picture is from the website when I bought it) I hope it makes a bit more more sense.

Now you don't...

It took three or four days of concentrated effort to get the front fibreglass separated from the bulkhead. A little damage has been done bit nothing that can't be repaired and I'm quite pleased that it didn't go horribly wrong. It's not something I would say was good fun - disaster is only one step away at all times.

I built a dolly out of the trolley that I made for the gearbox so that I could move it round the house reasonably easily. It's not heavy even with the radiator support still attached (to give some rigidity) but it is a bit unwieldy. With my wife's help I lifted the front off the car and laid it down carefully on the dolly and fixed it with cable ties to stop it falling off. It's now sitting under cover at the back of the house and will be attended to in due course. The thin strip of fibreglass at the back of the clip is very vulnerable now that it isn't attached to anything and a steel brace was clamped firmly to the fibreglass to give it some support.

Next steps will be to examine the bulkhead in detail and see what I need to do to enable access to the bits of the birdcage that need to be replaced or repaired.

It may seem quite odd that 2 years into a rebuild I am still ripping bits of the car but having a quick look to see where the project started from (this picture is from the website when I bought it) I hope it makes a bit more more sense.


