Engine issues - advice needed

MilkyNoSugar

CCCUK Member
First weekend where I could get some work done on the car following my knee surgery and the friends were available to help, and made reasonable progress before my knees started to complain.

The intake manifold and carb, and rocker covers were already removed. We got the alternator, water pump, bonnet, and radiator removed and oil drained. We took the rocker arms off, push rods and lifters out and moved the pipes and threaded studs over the new water pump.

First problem of the day was that the damper puller my friend said he would bring, was the wrong type so we could not get the timing cover off or cam out. Got a new puller on order along with a damper installation tool so we should be able to make progress when they arrive.

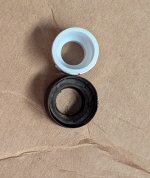
We then moved on to swapping the valve springs and seals that came with the rocker kit. We decided to try and do this with the heads in situ as the exhaust manifold bolts look like they have not been touched in 52 years and I do not want to make the job any bigger than it needs to be with a broken bolt in the head or block. Air line attached to the spark plug hole, and home made valve spring compressor deployed (waiting for a new one to arrive) we got the old spring removed. Second problem of the day was that the supplied valve stem seals were too small. The Inner Diameter of the ones we took off is approx 15mm, the new ones are only 12mm. There was no mention of needing to modify the valve stems, but from the research done this looks like what we are supposed to do. Have I missed something obvious here?
PXL_20240915_102357837.jpg
 
Last edited:

MilkyNoSugar

CCCUK Member
Another day on the corvette.

Good progress today with one exception.

Good news. New valve springs and seals fitted. Lots of cleaning and painting in preparation of putting everything back together.

Bads news. Cannot get the harmonic damper off the crank. The Sealey puller broke before anything moved. I had applied heat and used plenty of penetrating oil, and yes I had removed the bolt and washer.

Any suggestions welcome for getting the damper off.
 

Oneball

CCCUK Member
I didn’t mean hit the crank. I don’t want a disagreement so have deleted my post.
 
Last edited:

Emc

Supporting vendor
Do the puller up then hit the end of the puller bolt straight on with a metal hammer.

If that doesn’t work leave it done up and apply heat but it’ll take about half an hour of heating with an hot air gun as it’s a big heat sink. Keep hitting the bolt

If that still doesn’t work leave the puller on over night. Keep hitting the bolt

Or any combination of the above.
Bad advice the crank should never be hit, get a better puller
 

MilkyNoSugar

CCCUK Member
DPTOOL Harmonic Balancer Puller Removal & Install Tool versus a 1972 harmonic balancer.

90 minutes of effort.

I tightened the puller as much as I dared, and it was starting to bend the plate. I then got a paint stripper heat gun on and heated the balancer, occasionally turning the bolt to apply even more pressure. At 102 degrees centigrade, there was a sudden audible ping, and the puller had won the battle. I did have to jack the engine up to give me enough clearance to get the balancer of the crank without it catching on the cross member.

For anyone else who is struggling to remove the balancer, the DPTOOL is much better than the previous Sealey tool.
 

MilkyNoSugar

CCCUK Member
It's been a while since I last updated this thread.

The engine was definitely overdue for a rebuild. The old timing chain was so slack, it's a miracle it hadn't skipped a tooth. The camshaft was worn out, and the followers were badly worn. I was amazed by the variety of valve stem seals—I didn't know there were so many types!

I installed the new camshaft kit and reassembled everything. The engine turned freely by hand, and oil pressure built up during cranking without the ignition coil connected. As part of this process, I cleaned and repainted several components at the front and top of the engine. I also removed and cleaned the sump pan, but found no significant metal debris in the oil.

When I finally fired up the engine, the previous top-end noise was gone, but there was still a terminal noise. Initially, I had suspected the noise was all top end, which was backed up by what I found on inspection but it seems there is a remaining problem with the crankshaft bearings or something at the bottom end. The sound was concerning enough to shut the engine down immediately. It's hard to describe the disappointment I felt at that moment.

It was time to remove the engine and consult a specialist, as this issue is beyond my capabilities.

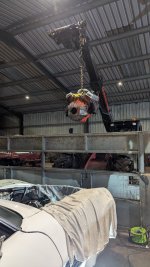
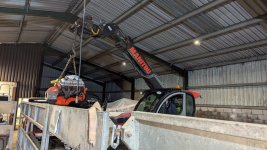
I've heard some people complain about the difficulty of removing the engine due to its size, weight, and the need to lift it over the front of the car. I'm not sure what the issue is, as we didn't encounter any significant problems using a small engine hoist. :)

PXL_20241123_160623326.jpgPXL_20241123_160648913.jpg
 

MilkyNoSugar

CCCUK Member
As people say “ big is better”
In this case, yes big is better and made light work of the job. Not ideal conditions for stripping and rebuilding an engine but it is nice to have the Manitou and the space for things like this. Blessed with some very nice friends.....
 

MilkyNoSugar

CCCUK Member
If you are gonna do a lift , go big !!! :LOL:
We certainly go big on the farm. It's a bit like your train stuff Chuffer. You want a 3 or 4 inch spanner, no problem, there is a choice of several dating back to the dark ages. However, you will be searching for weeks for an 8mm spanner.
 

Roscobbc

Moderator
We certainly go big on the farm. It's a bit like your train stuff Chuffer. You want a 3 or 4 inch spanner, no problem, there is a choice of several dating back to the dark ages. However, you will be searching for weeks for an 8mm spanner.
Hate metric measurements - give me 'thou's (alias knat cocks) and 'tenths at any time - so eary to visualise too!
 

Eden_

New user
Excellente déù
ou acheter cialis en toute confiance
  1. How about doing compression tests on the cylinders first and then leak down tests ?
  2. Hand crank the engine via crank bolt and listen to the valve train
  3. Pull spark plugs to check color and tips
  4. Take valve covers off and look for any damage to rockers to down to the lifters
  5. Take dist cap off, turn engine over and see if rotor tip is pointing to number 1 cylinder when on top of stroke
Wooh! Excellent approach to follow
 

antijam

CCCUK Member
Hate metric measurements - give me 'thou's (alias knat cocks) and 'tenths at any time - so eary to visualise too!
I still measure things in imperial. My nephews have no idea as to what I’m asking for.
I was raised in the 'Imperial' age when measuring to a 'thou' was the height of accuracy. My latter working years were in the field of precision metrology (no, not meteorology). We produced measuring equipment capable of resolving dimensions to nanometres. There are 25,400 nanometres to the 'thou'...... :)
 

Chuffer

CCCUK Member
I was raised in the 'Imperial' age when measuring to a 'thou' was the height of accuracy. My latter working years were in the field of precision metrology (no, not meteorology). We produced measuring equipment capable of resolving dimensions to nanometres. There are 25,400 nanometres to the 'thou'...... :)
Now that`s what I call precise !! I tend to work to tolerances of plus or minus please yourself . :LOL:
 

MilkyNoSugar

CCCUK Member
So, I have got the engine report back from Dan at Stubbs Racing Engines......

He got the big block fully stripped down and reported it's not good news, however this is some positive !

The engine is on a standard bore size (this is extremely rare for these engines now) so this is good news and the engine looks like it has never been apart before so this is good. It even has the original General Motors bearings and Pistons etc, it's all original ! Also the engine is a 4 bolt main block so it is one of the strongest Big Block Chevy's GM ever produced. This casting number is typically high in nickel content which makes them strong !

He has rebuilt countless Big Block Chevrolet engines and only ever come across one other that was totally standard with a standard bore size.

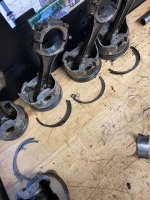
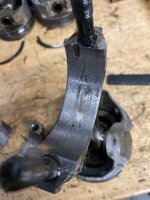
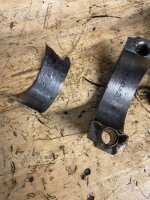
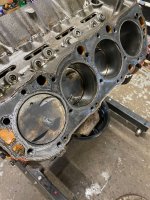
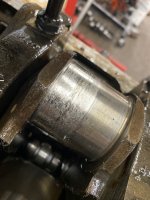
Cylinder number 6 has a spun connecting rod bearing. This would be the bottom end noise. Unfortunately it has damaged the crankshaft beyond repair and the crank will need to be replaced along with all Connecting rods as the rotating assembly has been subject to extreme heat. He also found 4 broken piston rings. The bores are worn and the block will need a Re-bore and hone along with larger pistons and rings. Also recommend skimming the deck surface of the block and the cylinder heads to ensure a good head gasket seal. It will need new main bearings, con rod bearings, cam bearings. To add insult to injury, running the engine for only a few minutes a, few times, rather than going through the cam break in process of running it fast and hot has damaged the new cam and lifters.

So to recap the engine does need a full rebuild. In actual fact to say its never been rebuilt/opened up since it was originally built it hasn't done bad was the verdict.

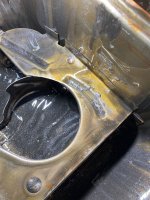
WhatsApp Image 2024-12-06 at 14.36.39 (1).jpegWhatsApp Image 2024-12-06 at 14.36.39.jpegWhatsApp Image 2024-12-06 at 14.36.38 (1).jpegWhatsApp Image 2024-12-06 at 14.36.38.jpegWhatsApp Image 2024-12-06 at 14.36.36 (1).jpegWhatsApp Image 2024-12-06 at 14.36.40.jpeg

I am shocked by how much metal there is in the oil pan. I checked the oil that came out of the car and whilst here were a few traces of metal glistening in the oil it was in keeping with what might be expected from the cam and lifters that had worn. The oil pan was spotless when it went back on the car after the cam was installed and the car ran for no more than 10 minutes in he garage.

I do wonder if the bottom end has been failing for some time and got to a critical point of heat build up on the M1.

The car is going to be off the road for a month or two longer while this is sorted.
 

Roscobbc

Moderator
Sorry to hear about the 'issues'........however.......this now presents you with an interesting window of 'opportunity' (presuming your pocket is deep enough).
The cost of a good quality forged steel stroker crankshaft and conrods (Eagle or similar) will be certainly be more expensive than a stock type cast steel crank and rods......but not significantly so. The additional capacity really will make a significant and noticeable difference in engine torque.......especially if you invest in a pair of new heads too. No need to go too wild, and a mild hydraulic cam is all that is needed.
 

teamzr1

Supporting vendor
You need to consider what type and octane of gas you normally use
as to engine compression, thickness of head gaskets or if stroking or boring cylinders and CAM grind
Porting heads or milling them down a bit

as related to engine knock and misfire issues

Also, the CFM of carb you select
 
Top