Exciting day - rebuild of 78 coupe

CaptainK

CCCUK Member
My alternator bracket must be different to yours, as it doesn't attach to the exhaust manifold, but I will have to make up a spacer for the A/C compressor bracket.
I've ordered the ceramic coated headers, so hopefully they will stay looking lovely :) . Have you got the original large starter motor, or one of the newer miniature ones? I am a bit worried about heat getting to my old style large starter.
Ahhh... maybe the alternator bracket on exhaust manifold is a 1968 model thing? Either way, good news for you. I only have the base Hedman Headers with no ceramic coating or anything fancy. I do have the original large starter motor, and so far no issue with heat on the motor (just on the carb causing percolation - but I think I had that before the headers anyway).
 

johng

CCCUK Member
I got a bit bored today, whilst waiting for the container ship to make it's way across the Atlantic, so I decided to have a go at making my water temp gauge more accurate. In case anyone doesn't remember my post from February, my gauge is reading 155F when it should read 180F. I removed the gauge cluster from the centre console (which is something of a faff) and removed the resistor from the back of the temp gauge. Everything I'd read said that this should be a 90ohm resistor, but mine measured 66ohms (assuming my meter is accurate of course). I then wired in a 0 to 200ohm potentiometer across the terminals that I'd removed the resistor from. Once I'd got everything back together I started up the car and let it fully warm up. My IR gun said the temperature by the thermostat (and also on the water pump) was 180F, so I adjusted the potentiometer until the gauge said the same. The potentiometer resistance is now 50ohms. Job done (hopefully!)
 

johng

CCCUK Member
The container ship has successfully navigated the Atlantic and is currently moored in Antwerp. It should leave for Hamburg tonight and dock in London on Monday. Hopefully I'll be collecting my exhaust the following Monday. It seemed like a good idea to make a start on the exhaust covers, so first I removed the original rocker covers. Half of the fixings for these had stripped threads which had been drilled out replaced by nuts and bolts, so I've now drilled out all the old fixings and replaced them with a repair kit, which should make it much easier to fit and remove the screws.
The exhaust covers themselves had 1 small chip which I've filled and a number of small lumps in the gel coat (not sure how they got there) which I've sanded down, so they are looking good.
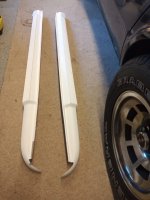
IMG_20240109_141319384.jpg
I then had a look to see how they were going to fit and that's where the problems started. I'm going to need to cut away some of the fibreglass bodywork just behind the front wheels to get the back end of the covers to line up with the rear wheelarch. That's not a problem, but then I realised I will probably also need to lose the bolt I've arrowed below to allow the exhaust pipe itself to fit. This bolt holds a metal splash panel in place.
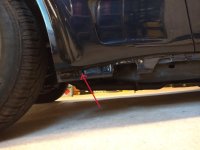
IMG_20240109_141104039 1.jpg
I also need to trim the top edge of the exhaust cover at the front to get it to sit at the right height.
Then I have another problem at the back end. The fibreglass section I've arrowed below sits about 6mm further outboard than the rest of the bodywork, so to avoid having a gap between the body and the exhaust cover I'll need to remove this section of fibreglass or cut away some of the exhaust cover.
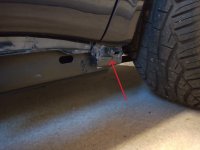
IMG_20240109_141137587 1.jpg
At this point I decided it would be better to wait for the rest of the exhaust, fit that and then see what else I need to modify.
 

Nassau65

CCCUK Member
It’s pretty normal to remove a bit of bodywork behind the front wheels to get side exhausts to fit.
I see you’ve got 1969 factory style fibreglass covers. Paint them aluminium colour rather than body colour, they look better.
 

johng

CCCUK Member
Yes my plan is to get them to look as close to the real thing as I can. At the moment it's looking like I will need to remove a bit of the splash shield as well which I wasn't expecting, but then I'm not sure if the early cars had the same splash shields anyway.
 

johng

CCCUK Member
That's interesting Tim, looks like you have the splash shield as well and have managed to keep the bolt in place. I'm going to have just 1 larger diameter pipe coming out under the chassis so I'm not sure until I fit it, whether it will be a problem
 

CaptainK

CCCUK Member
That's exciting that the project is almost underway - and glad to see those covers getting used. Can't wait to see the photos when its all done.

I'll have to have a look under my car at the section you mention now to see what was done to get mine to fit. Granted mine is a 1968 model, and the side pipes and covers were originally fitted by the previous owner in USA. Didn't realise cutting would be involved as I never looked under there.
 

johng

CCCUK Member
Whilst you're looking under there perhaps you can see if you have any additional fixings other than the screws along the top edge. If so a photo would be good.
 

CaptainK

CCCUK Member
Whilst you're looking under there perhaps you can see if you have any additional fixings other than the screws along the top edge. If so a photo would be good.
As you know - my memory is dreadful. I'd forgotten already. :oops: I'll try and have a look later.
 

CaptainK

CCCUK Member
As you know - my memory is dreadful. I'd forgotten already. :oops: I'll try and have a look later.
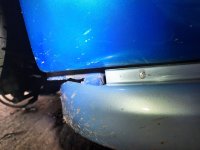
As you suspected, I forgot to have a look and take pictures. Then remembered and had a look and took a photo. Then promptly forgot I took the photos until this morning.

Anyway.... trying to get photos from underneath proved impossible really. They just didn't come out well. BUT, I do have the one photo from the outside of how my side pipe cover fits, demonstrating nicely how the front of it goes under the car, the little bit of the car bottom that was chopped to make it fit, and also how the front wheels "shotgun" the front of side pipe cover.
As for how the covers attach to the car, I think mine might actually just be the screws across the top. I think there should be a bracket or two that attaches to the bottom, but I can't see any. Mine seem to be firmly attached to the car though and have been there 7 years in my ownership, and however long in the USA with the previous owner.

20240115_150655.jpg
 

CaptainK

CCCUK Member
That's all good info, looks like I will need to protect the front edge
Yeah, probably a good idea. I'll be interested to see what solution you come up with. I was thinking maybe some clear thin plastic attached at the front of the cover. Fail that, mudflaps will do too :ROFLMAO:
 
Top