You are using an out of date browser. It may not display this or other websites correctly.
You should upgrade or use an alternative browser.
You should upgrade or use an alternative browser.
Exciting day - rebuild of 78 coupe
- Thread starter johng
- Start date
Roscobbc
Moderator
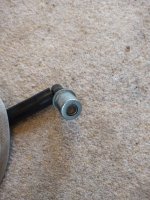
That fits in drivers side rocker cover John?Don't know, it came with the car. It looks like this
View attachment 26805
Does it 'rattle' if you give it a shake?
Roscobbc
Moderator
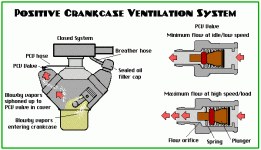
It should have a small amount of vacuum 'draw' when idling simply to suck-up any minor blow-past fumes. There is a spring inside that will holds the valve at a small opening to do this......at higher revs and/or if you have excessive crankcase pressure this pressure overcomes the PCV quiescent setting and effectively 'sucks' up all that blow-past. It should rattle if you give it a shake (proving it isn't gummed-up)That fits in drivers side rocker cover John?
Does it 'rattle' if you give it a shake?
...but perhaps had failed or been changed to an incorrect spec'.....and PCV's do differ.
I had quite a few similar issues with my engine to do with PCV's when new.
johng
CCCUK Member
It does rattle and certainly isn't a perfect seal, you can suck air through quite easily and if you simulate high crankcase pressure by pushing on the spring it does allow more air flow. It sort of sounds like how it should work, but perhaps the spring rate or seal isn't matched properly to the engine. It idles better without it fitted. I'll take the car for a spin tomorrow to see how it feels and then have another look at the plugs. If this isn't the problem then I'll need to look elsewhere (hopefully it's not the intake manifold).
teamzr1
Supporting vendor
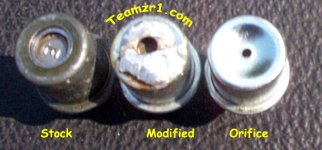
The PCV has a spring in it
That spring rating is what GM specs it to per engine design
Using the wrong PCV may cause it to open or close incorrectly
The spring overcomes a certain mount of vacuum pressure, GM set that spring rating they wanted per engine design
when not enough vacuum, the spring would cause that check valve to be closed / no flow and only opens when the
Vacuum overcomes the spring rating
Or the PCV is clogged up and not allowing full seal of the check valve
Shake it and see how easy or hard to move the check valve
Check the PCV is the correct GM part number
If the spring is good and the correct one should only be able to blow one direction
teamzr1
Supporting vendor
A Positive Crankcase Ventilation (PCV) system regulates the vacuum pull through its crankcase.
Once the vacuum gets higher than desired at idle, the PCV valve shuts off and stops that vacuum.
The drop in vacuum leads to an increase in RPM, which in turn allows more gas to be pulled in.
Once the vacuum gets higher than desired at idle, the PCV valve shuts off and stops that vacuum.
The drop in vacuum leads to an increase in RPM, which in turn allows more gas to be pulled in.
johng
CCCUK Member
Just a little update, took the car for a drive with the pcv port blocked off. It didn't feel any different, but pulled a couple of spark plugs afterward and they now look half white half tan. The new pcv has now arrived and I've fitted it. It seems much better, I now lose hardly any vacuum with it connected and the idle remains stable, so that's good news. I've also taken off the passenger side exhaust, which actually has a thin matt black coating of carbon inside, and re-fitted it paying particular attention to making sure all the joints were well sealed, to rule out the possibility of air being sucked in.
I read an interesting thread on the US forum today, where a guy was measuring his AFR at the tailpipe and getting figures of 22 to 1 (even worse than mine!). He also had a bung fitted further up the exhaust and was getting around 13 to 1 there. I'm now pretty convinced that my AFR numbers are not correct and are just a result of either air leaks into the exhaust or air being sucked in at the exhaust tip. Talking to the MOT tester, he had only put the probe about 30cm into my pipes, but he's happy to remove the clip that prevents it going in further and we are going to re-measure with the probe as far up into the exhaust as possible next Friday.
I read an interesting thread on the US forum today, where a guy was measuring his AFR at the tailpipe and getting figures of 22 to 1 (even worse than mine!). He also had a bung fitted further up the exhaust and was getting around 13 to 1 there. I'm now pretty convinced that my AFR numbers are not correct and are just a result of either air leaks into the exhaust or air being sucked in at the exhaust tip. Talking to the MOT tester, he had only put the probe about 30cm into my pipes, but he's happy to remove the clip that prevents it going in further and we are going to re-measure with the probe as far up into the exhaust as possible next Friday.
teamzr1
Supporting vendor
30 cm is, what, about 1 foot ?
Inserted into the muffler tip of the exhaust should be more than enough for a wideband O2 sensor
to get a decent reading of the exhaust makeup to determine what the AFR is
as SMOG test shops here only insert the WB O2 3–4 inches
I would question if the sensor is calibrated and its heater working to get to correct operating temperature
If that other car's vehicle was reporting 22.0:1 AFR there would be clearly heard engine knock
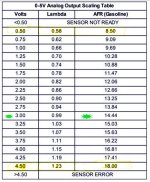
If you do this test again, I would be interested in seeing what the exhaust makeup was to crosscheck the above output voltage
to the exhaust makeup as to AFR by the gases I point to below

Inserted into the muffler tip of the exhaust should be more than enough for a wideband O2 sensor
to get a decent reading of the exhaust makeup to determine what the AFR is
as SMOG test shops here only insert the WB O2 3–4 inches
I would question if the sensor is calibrated and its heater working to get to correct operating temperature
If that other car's vehicle was reporting 22.0:1 AFR there would be clearly heard engine knock

If you do this test again, I would be interested in seeing what the exhaust makeup was to crosscheck the above output voltage
to the exhaust makeup as to AFR by the gases I point to below

johng
CCCUK Member
Yes 30cm is a foot. Like you I initially thought that would be fine, as the standard equipment the tester used will only allow it to go in that far (unless you remove the clip that is fixed to the probe to hang it up by). I'm still not sure if the problem is air leaking in from a joint, or coming in from the tip. That's why I've only resealed one of the exhaust pipes, last time both sides had similar results, so next time I'll get him to measure both sides with the probe inserted as far a possible and just the original 12 inches. The readout I got first time around showed CO at 0.14% and HC at 1200ppm, which from what I've read suggests the presence of lots of oxygen and lots of unburnt fuel. If that's right then I'm probably running rich with lots of air being sucked in. Interesting that you mention calibration, as the test equipment is due for it's 6 monthly calibration next Wednesday, which is why I'm not going back until Friday.
johng
CCCUK Member
Updated results. Went back and had my AFR re-measured with the freshly calibrated analyser and got the same results as before on both sides of the car (18:1 at 2000rpm and 3000rpm). Tried removing the clip on the probe but that just gave us an extra 6 inches and made no difference.
Today I went to a different garage and with the probe in 18 inches it measured 18:1 at 2000rpm and 3000rpm. Then we added a length of rubber hose to the probe (now 33 inches in length) and it still measured the same. Can't really go in any further with rubber hose as we nearly melted the one we used today!
Other than buying a wideband sensor and getting a bung welded into the exhaust, I'm not sure what to do now. I don't believe the car is really running that lean, so air must still be getting into the exhaust somehow. Hopefully I'll get to the Nationals this weekend without burning an exhaust valve!
teamzr1
Supporting vendor
What is the makeup of the exhaust system ?
Best case t easy debug the problem is either make a smoker, cheap, I can tell you how to make one as I did
or buy one, about $100, or borrow or steal one
all it takes is a slight exhaust leak, worse when the engine is controlled by a controller and O2 sensors
Without those, what is read out the tailpipe might not be what visual or engine knock tells
If 18:1 AFR than should have lots of knock and the sparkplug tips be white
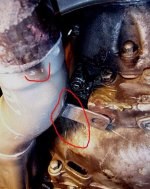
Many of the exhaust leaks can be a small crack in a weld of exhaust or where pipes couple together
an example of a C6 owner had issues that people could not figure out, as seen below
so I used a smoker and spent more time jacking up the car than the few minutes to see where smoke was leaking out
Here I found 2 leaks, one where pipes coupled to collector, and collector bracket
Headers were mild steel, the weld was thick, when both heating up the expansion of pipe and weld were different and of course contracted different when cooling causing weld to crack off pipe
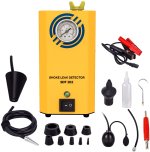
If not making a smoker, many types can be bought
Best is one that allows to change the amount of smoke pressure needed
Best case t easy debug the problem is either make a smoker, cheap, I can tell you how to make one as I did
or buy one, about $100, or borrow or steal one
all it takes is a slight exhaust leak, worse when the engine is controlled by a controller and O2 sensors
Without those, what is read out the tailpipe might not be what visual or engine knock tells
If 18:1 AFR than should have lots of knock and the sparkplug tips be white
Many of the exhaust leaks can be a small crack in a weld of exhaust or where pipes couple together
an example of a C6 owner had issues that people could not figure out, as seen below
so I used a smoker and spent more time jacking up the car than the few minutes to see where smoke was leaking out
Here I found 2 leaks, one where pipes coupled to collector, and collector bracket
Headers were mild steel, the weld was thick, when both heating up the expansion of pipe and weld were different and of course contracted different when cooling causing weld to crack off pipe

If not making a smoker, many types can be bought
Best is one that allows to change the amount of smoke pressure needed

teamzr1
Supporting vendor
Hi Johng
Multi ways to make your own diag smoker
Here is a real cheap way, all types need a air source to make low pressure
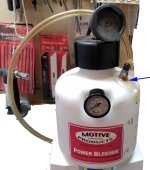
Here is a way using a tool to flush brake fluid lines
This has a hand pump to create air pressure, or you see I installed a valve stem to instead use an air compressor with regulator to adjust PSI I want
I prefer and made mine using a small car or kitchen fire extinguisher, ( I thought this up while having a wet dream
I empty it, then flush it
Parts I used (also for brake unit above)
1. any auto parts store would sell GM glow plugs, this will be the heater
2. to prevent getting too hot I used a 12 volt turn signal flasher, this will auto cycle on/off, so the glow plug never gets too hot
but enough to cause oil to smoke
3. 12 volts on/off switch
4. wires
5. wiring clips to connect to a battery
6. wheel valve stem, to connect air source to flow through the smoker
7. hose to connect to the output of the fire extinguisher
8, steel pad, like what is used when painting, like a Brillo pad.
This acts like a wick and draws fluid up from bottom to top of pad where glow plug is
9. could use like baby oil or auto tranny fluid
Fill bottom of fire extinguisher with the steel pad
Drill a hole so the glowplug is sitting just below the pad , do what is needed to mount and seal the glowplug
Wiring,
Black wire from ground side of the battery to lug you mount to the extinguisher (glow plug needs it)
Red wire from battery, othe end mount single pole on/off switch
Other side of switch to turn signal flasher
Other side of flasher to glowplug,
Mount the valve stem up high, to generate the extinguisher under pressure
Fill your oil so it is lower than glowplug
Try at first like 2 PSI air pressure
Jack up vehicle with jack stands
Consider what the lighting is to assure being able to see the smoke
Whatever oil you use smell that smoke so you know it when you smell it as the leak can be small and not seeing
the smoke but can smell about where it is coming from
Stuff exhaust tips tightly with rags to seal well
Prop butterfly of in your case the carb, insert output smoker hose and seal carb with rags, etc to seal
Shake extinguisher to assure oil is soaked the steel pad
Connect to your battery, turn PSI flow on, turn switch on.
Now very closely examine and look (like this for direction of smoke or smell oil
Questions ?
Ask

If need be increase air pressure to like 5 PSI
Turnsignal flasher will be clicking as it contacts heats up, opens circuit, cools off closes circuit
Multi ways to make your own diag smoker
Here is a real cheap way, all types need a air source to make low pressure
Here is a way using a tool to flush brake fluid lines
This has a hand pump to create air pressure, or you see I installed a valve stem to instead use an air compressor with regulator to adjust PSI I want
I prefer and made mine using a small car or kitchen fire extinguisher, ( I thought this up while having a wet dream
I empty it, then flush it

Parts I used (also for brake unit above)
1. any auto parts store would sell GM glow plugs, this will be the heater
2. to prevent getting too hot I used a 12 volt turn signal flasher, this will auto cycle on/off, so the glow plug never gets too hot
but enough to cause oil to smoke
3. 12 volts on/off switch
4. wires
5. wiring clips to connect to a battery
6. wheel valve stem, to connect air source to flow through the smoker
7. hose to connect to the output of the fire extinguisher
8, steel pad, like what is used when painting, like a Brillo pad.
This acts like a wick and draws fluid up from bottom to top of pad where glow plug is
9. could use like baby oil or auto tranny fluid
Fill bottom of fire extinguisher with the steel pad
Drill a hole so the glowplug is sitting just below the pad , do what is needed to mount and seal the glowplug
Wiring,
Black wire from ground side of the battery to lug you mount to the extinguisher (glow plug needs it)
Red wire from battery, othe end mount single pole on/off switch
Other side of switch to turn signal flasher
Other side of flasher to glowplug,
Mount the valve stem up high, to generate the extinguisher under pressure
Fill your oil so it is lower than glowplug
Try at first like 2 PSI air pressure
Jack up vehicle with jack stands
Consider what the lighting is to assure being able to see the smoke
Whatever oil you use smell that smoke so you know it when you smell it as the leak can be small and not seeing
the smoke but can smell about where it is coming from
Stuff exhaust tips tightly with rags to seal well
Prop butterfly of in your case the carb, insert output smoker hose and seal carb with rags, etc to seal
Shake extinguisher to assure oil is soaked the steel pad
Connect to your battery, turn PSI flow on, turn switch on.
Now very closely examine and look (like this
Questions ?
Ask

If need be increase air pressure to like 5 PSI
Turnsignal flasher will be clicking as it contacts heats up, opens circuit, cools off closes circuit
johng
CCCUK Member
It's been a while, but thought I'd give an update on the Air Fuel Ratio situation. My lovely wife bought me a wideband sensor kit for my birthday and I've had a bung welded into the exhaust.
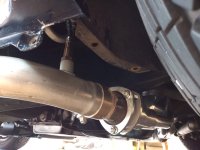
The surprising result was that I found the car was running a bit rich at idle, which gradually leaned out as you increase revs up to 2000rpm and then shot up to 17.5:1
The value that was measured at the MOT station was actually in terms of lambda (it was a value of 1.22), I'd multiplied this by 14.7 to get an AFR of 18:1. I realize now that was wrong, because the value of 14.7 is for pure petrol. For the E5 that I'm using it should be 14.4 and that makes the MOT measurement an AFR of 17.6:1. Basically, the MOT station measurement was correct all along!
Taking the car for a drive it was running at 17.5:1 whilst cruising anywhere from 45 to 60mph, hopefully I haven't done the exhaust valves any damage.
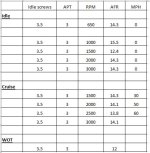
It was simple to fix the idle mixture, just needed to go from 4.5 turns out to 3.5 turns out and also it was easy to fix the cruise mixture as well. On my carb you can adjust the Adjustable Part Throttle from outside of the carb and winding this up brought the cruise AFR down to 14.3.
Here are the results I ended up with.
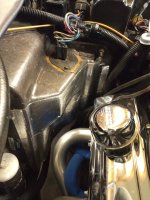
One other little job that seems to work well was for my Air Con. The air box that houses the evaporator is very close to my headers and gets too hot to touch, which can't do much good for the cold air inside it. I've now covered the box with some self adhesive aluminised fiberglass sheet. Now the box doesn't get hot at all and the air con seems to work much better (although maybe that just because it's not very hot out now).

The surprising result was that I found the car was running a bit rich at idle, which gradually leaned out as you increase revs up to 2000rpm and then shot up to 17.5:1
The value that was measured at the MOT station was actually in terms of lambda (it was a value of 1.22), I'd multiplied this by 14.7 to get an AFR of 18:1. I realize now that was wrong, because the value of 14.7 is for pure petrol. For the E5 that I'm using it should be 14.4 and that makes the MOT measurement an AFR of 17.6:1. Basically, the MOT station measurement was correct all along!
Taking the car for a drive it was running at 17.5:1 whilst cruising anywhere from 45 to 60mph, hopefully I haven't done the exhaust valves any damage.
It was simple to fix the idle mixture, just needed to go from 4.5 turns out to 3.5 turns out and also it was easy to fix the cruise mixture as well. On my carb you can adjust the Adjustable Part Throttle from outside of the carb and winding this up brought the cruise AFR down to 14.3.
Here are the results I ended up with.

One other little job that seems to work well was for my Air Con. The air box that houses the evaporator is very close to my headers and gets too hot to touch, which can't do much good for the cold air inside it. I've now covered the box with some self adhesive aluminised fiberglass sheet. Now the box doesn't get hot at all and the air con seems to work much better (although maybe that just because it's not very hot out now).


