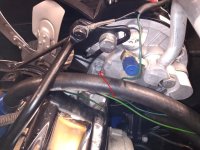
Exciting day - rebuild of 78 coupe

johng

CCCUK Member
Well it's been a while, but got back on to the air con over the past week. I've taken apart every joint, checked and replaced seals, pressurised the system with air and used soap suds to check for leaks and still no joy. So today I drove to a chap in Aveley who does mobile aircon re-charging (his company is called David's Aircon). He advertised that if he couldn't fix a leak he would identify where it was for £15, seemed like a good deal. It turned out to be even better than that! He pressurised the system with nitrogen to 200psi (I had only been going up to 80psi with my compressor) and immediately you could hear the leak, which turned out to be in the evaporator pipe just where it goes into the box. As it was done so quickly he wouldn't let me pay him anything. So now I have a new evaporator and another dryer on order from Rockauto and once they are fitted I will be getting David to re-test, evacuate and charge it up. His charge for this is also very reasonable at £60 for 1kg of gas. Hopefully I'll have some cold air in a few weeks time.
 

Mad4slalom

Well-known user
Hopefully there will be some good weather for you to try it out.
Well it's been a while, but got back on to the air con over the past week. I've taken apart every joint, checked and replaced seals, pressurised the system with air and used soap suds to check for leaks and still no joy. So today I drove to a chap in Aveley who does mobile aircon re-charging (his company is called David's Aircon). He advertised that if he couldn't fix a leak he would identify where it was for £15, seemed like a good deal. It turned out to be even better than that! He pressurised the system with nitrogen to 200psi (I had only been going up to 80psi with my compressor) and immediately you could hear the leak, which turned out to be in the evaporator pipe just where it goes into the box. As it was done so quickly he wouldn't let me pay him anything. So now I have a new evaporator and another dryer on order from Rockauto and once they are fitted I will be getting David to re-test, evacuate and charge it up. His charge for this is also very reasonable at £60 for 1kg of gas. Hopefully I'll have some cold air in a few weeks time.
Cool!, … or should I say “Cold”! 😂👍
 

johng

CCCUK Member
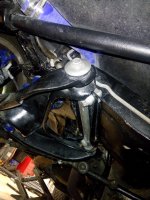
Whilst lying under the car removing the leaky evaporator, I had a general look around and noticed that there was a gap between the passenger side lower control arm shaft and the chassis frame., as shown by the arrow. Actually you need to zoom in to see it, but it's there honest!

InkedIMG_20220308_133544_LI.jpg

Thinking that the bolts must have somehow worked loose, I checked the torque and found that were actually tight. Looking at the driver's side which didn't have a gap I realised that the shaft has to go on in a certain orientation and I had fitted it 180 degrees out, when I rebuilt the suspension a couple of years ago!
This kept me busy all afternoon, as I had to remove the damper, fit a spring compressor, undo all 3 bolts and rotate the shaft. I was a bit concerned that when I removed the bolts the arm would move sideways and I wouldn't be able to refit them, but whilst it did move a very small amount it was easy enough to move it back with a pry bar. The biggest problem was getting a spanner on the top of the rear bolt, as the transmission cooler lines were smack bang on top of it.
Still shaft was rotated and bolted back up with no gap now.


IMG_20220308_154956.jpg

Now I'm not sure if this will have affected my front end geometry, I hope not.
 

Adtheman

Well-known user
Well it's been a while, but got back on to the air con over the past week. I've taken apart every joint, checked and replaced seals, pressurised the system with air and used soap suds to check for leaks and still no joy. So today I drove to a chap in Aveley who does mobile aircon re-charging (his company is called David's Aircon). He advertised that if he couldn't fix a leak he would identify where it was for £15, seemed like a good deal. It turned out to be even better than that! He pressurised the system with nitrogen to 200psi (I had only been going up to 80psi with my compressor) and immediately you could hear the leak, which turned out to be in the evaporator pipe just where it goes into the box. As it was done so quickly he wouldn't let me pay him anything. So now I have a new evaporator and another dryer on order from Rockauto and once they are fitted I will be getting David to re-test, evacuate and charge it up. His charge for this is also very reasonable at £60 for 1kg of gas. Hopefully I'll have some cold air in a few weeks time.
Its cold enough at the minute if you just open the window John. :)
 

johng

CCCUK Member
Actually it was pretty warm here today. Anyway I'm just planning ahead for another scorching Nationals this summer.
 

johng

CCCUK Member
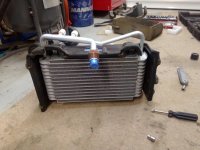
The aircon bits from Rockauto arrived yesterday (5 days from order as usual), so I fitted the new evaporator into it's enclosure.
IMG_20220311_132426.jpg

Then rebuilt the system, connected up my valves and pumped all the air out of it. Today the vacuum is still there at the same pressure, so I finally seem to have a leak free system :) .
Of course, as usual for every step forward there is also one backwards. The inlet pipe of the new evaporator sits a little higher than the old one, which means that the bracket that holds the liquid line to the inner fender now won't fit under the fender and as it stands I can't close the bonnet!
InkedIMG_20220312_110948_LI.jpg

I could probably fix this by bending the evaporator inlet pipe, but that didn't work well for me last time I tried it, so I may just cut off the offending piece of bracket.
 

johng

CCCUK Member
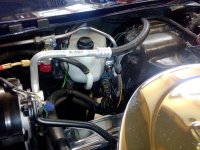
As per Tim's instructions, I've cut the bracket. I still had to bend the pipe a small amount to get the liquid line as low as possible, because it was still touching the bonnet. Even then, I had to put in an additional rubber block to raise the bonnet line slightly to just get enough clearance to fit a sheet of paper in!! The inlet pipe of the new evaporator must be about 20mm longer than the original.

IMG_20220315_145810.jpg

Still, the new dryer is also fitted and the system is holding a vacuum so I just need to get it filled with gas
 

johng

CCCUK Member
So about a month ago I was stupid enough to say that now "I just need to get it filled with gas"!

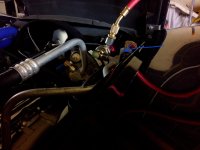
I did get it filled with gas but the system didn't produce much the way of cold air, the compressor got very hot indeed and the pressures were not what as expected. My friendly aircon man thought it looked like there was a blockage somewhere and after a bit of inspection, we found it. The hose connection to the top of the condenser is very difficult to get to without removing the bonnet (if I ever do this again I will remove the bonnet). Without realising it, whilst tightening this joint I had managed to twist the condenser inlet pipe and severely restrict the flow through it:(. Whilst discussing things we also realised that there didn't appear to be any high pressure cut out in the system. The old compressor had what looked like a pressure relief valve, but the new one just appeared to have a blanking plug and this wasn't the same thread as the relief valve from the old compressor. At this point I decided to give up whilst I investigated how to build some sort of over pressure protection into the system and see if the condenser was salvageable.
It was easy to un-twist the condenser inlet pipe, which looked like it would then allow a proper flow through it, although to what extent this has weakened it I can't be sure!
I contacted the compressor manufacturer who were very helpful and told me that what I thought was a blanking plug was in fact a relief valve, but it's set to blow at 500psi and at this point it actually ruptures the thin outer skin. This is the relief valve
IMG_20220321_194227433_LI.jpg
I decided I could do with some better protection than this and found a binary switch to replace the existing pressure switch (which cuts out the compressor if the gas pressure drops below about 30psi). The binary switch also does this, but also cuts out the compressor if the pressure goes above 380psi (still high but not so high as the relief valve and it resets itself). The problem with this was that the switch has a female thread of 7/16unf x 20tpi and the port on the car was 3/8unf x 24tpi, so I needed a thread adapter. After a lot of searching I found this one Brass Union 7/16" UNF MALE to 3/8" UNF Female The next problem was how to make it seal properly. This required drilling out appropriate sized holes in both ends of the brass union to allow the o rings to fit. Having done this I checked that the whole system still held a vacuum and finally today took it back to "just have it filled with gas"
The good news is that it now produces nice cold air. At a high tickover the high pressure side is around 200psi and the low pressure side is around 40psi and so far nothing has leaked!! The only bad news is the drive belt is chirping a bit so I need to try tightening it up. Oh also I want to put some insulation around the cold inlet to the evaporator, as it's conveniently positioned close to the nice hot exhaust manifold
 

TimP

CCCUK Member
So about a month ago I was stupid enough to say that now "I just need to get it filled with gas"!

I did get it filled with gas but the system didn't produce much the way of cold air, the compressor got very hot indeed and the pressures were not what as expected. My friendly aircon man thought it looked like there was a blockage somewhere and after a bit of inspection, we found it. The hose connection to the top of the condenser is very difficult to get to without removing the bonnet (if I ever do this again I will remove the bonnet). Without realising it, whilst tightening this joint I had managed to twist the condenser inlet pipe and severely restrict the flow through it:(. Whilst discussing things we also realised that there didn't appear to be any high pressure cut out in the system. The old compressor had what looked like a pressure relief valve, but the new one just appeared to have a blanking plug and this wasn't the same thread as the relief valve from the old compressor. At this point I decided to give up whilst I investigated how to build some sort of over pressure protection into the system and see if the condenser was salvageable.
It was easy to un-twist the condenser inlet pipe, which looked like it would then allow a proper flow through it, although to what extent this has weakened it I can't be sure!
I contacted the compressor manufacturer who were very helpful and told me that what I thought was a blanking plug was in fact a relief valve, but it's set to blow at 500psi and at this point it actually ruptures the thin outer skin. This is the relief valve
View attachment 16430
I decided I could do with some better protection than this and found a binary switch to replace the existing pressure switch (which cuts out the compressor if the gas pressure drops below about 30psi). The binary switch also does this, but also cuts out the compressor if the pressure goes above 380psi (still high but not so high as the relief valve and it resets itself). The problem with this was that the switch has a female thread of 7/16unf x 20tpi and the port on the car was 3/8unf x 24tpi, so I needed a thread adapter. After a lot of searching I found this one Brass Union 7/16" UNF MALE to 3/8" UNF Female The next problem was how to make it seal properly. This required drilling out appropriate sized holes in both ends of the brass union to allow the o rings to fit. Having done this I checked that the whole system still held a vacuum and finally today took it back to "just have it filled with gas"
The good news is that it now produces nice cold air. At a high tickover the high pressure side is around 200psi and the low pressure side is around 40psi and so far nothing has leaked!! The only bad news is the drive belt is chirping a bit so I need to try tightening it up. Oh also I want to put some insulation around the cold inlet to the evaporator, as it's conveniently positioned close to the nice hot exhaust manifold
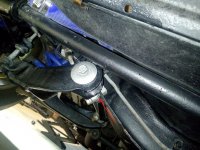
There's some really good detective work in this - nice job! and well done in getting a fully working system again!
 

johng

CCCUK Member
Just as I was starting to think that I didn't have anything left to do on my car and I needed to dream up some improvements to keep me busy, my car obligingly found something for me to do! I'd noticed a couple of weeks ago that the aircon wasn't working on Max, although it did work fine on Normal, so I thought I'd investigate today. I quickly found that when switching to Max, the actuator for outside air closed, but the actuator for inside air didn't open, so there was no air supply at all. I checked the inside air actuator which worked fine, but it didn't have enough strength to overcome the return spring. On checking the vacuum at the actuator I found it was very low, hence the lack of pulling power. I suspected the problem was the vacuum switch, as I'd had to take this apart and make it work early on in my rebuild, but as it is a little tricky to get to I thought I'd check other possible causes first. The engine is making plenty of vacuum, but it turned out that most of it was being lost via the headlamps. If I removed the headlamps from the circuit then the aircon worked perfectly. A bit more checking turned up a split in one of the headlamp vacuum pipes (easily fixed), but more annoyingly both vacuum relays are leaking. I'd replaced both of these a couple of years ago. Since they are not particularly cheap and obviously not of great quality, I'm going to see if I can repair them. I've taken apart my original ones which I fortunately didn't throw away when I replaced them and they are very simple inside, just a rubber piston moving inside a plastic tube. The rubber is no longer a tight fit in the tube, so I'm currently soaking one in brake fluid to see it that will swell it a bit. If that doesn't work I'll try cutting a groove and fitting an O ring. If I'm lucky enough to get them to work I'll post some photos.
 

Mad4slalom

Well-known user
Just as I was starting to think that I didn't have anything left to do on my car and I needed to dream up some improvements to keep me busy, my car obligingly found something for me to do! I'd noticed a couple of weeks ago that the aircon wasn't working on Max, although it did work fine on Normal, so I thought I'd investigate today. I quickly found that when switching to Max, the actuator for outside air closed, but the actuator for inside air didn't open, so there was no air supply at all. I checked the inside air actuator which worked fine, but it didn't have enough strength to overcome the return spring. On checking the vacuum at the actuator I found it was very low, hence the lack of pulling power. I suspected the problem was the vacuum switch, as I'd had to take this apart and make it work early on in my rebuild, but as it is a little tricky to get to I thought I'd check other possible causes first. The engine is making plenty of vacuum, but it turned out that most of it was being lost via the headlamps. If I removed the headlamps from the circuit then the aircon worked perfectly. A bit more checking turned up a split in one of the headlamp vacuum pipes (easily fixed), but more annoyingly both vacuum relays are leaking. I'd replaced both of these a couple of years ago. Since they are not particularly cheap and obviously not of great quality, I'm going to see if I can repair them. I've taken apart my original ones which I fortunately didn't throw away when I replaced them and they are very simple inside, just a rubber piston moving inside a plastic tube. The rubber is no longer a tight fit in the tube, so I'm currently soaking one in brake fluid to see it that will swell it a bit. If that doesn't work I'll try cutting a groove and fitting an O ring. If I'm lucky enough to get them to work I'll post some photos.
good work 👍
 

johng

CCCUK Member
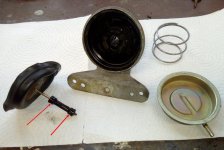
So the piston I soaked overnight does seem to have swollen and is now a much better fit in the tube. With a bit of silicone grease on it, it currently doesn't leak. I'm not sure though how long lasting this is going to be, so I've also tried the o ring idea on my second original relay (I haven't taken the new ones apart yet). Just putting an o ring on the piston where the red arrows are on this photo doesn't work.
headlamp relay.jpg

The o rings are too big to fit inside the tube and just slide off. However, by cutting away some of the rubber in the grooves I could then get the o rings on and get them into the tube. This relay now doesn't leak either, my only concern again is longevity because I'm not sure quite how much rubber is left underneath the o rings! Still if these 2 fail, I have another 2 to play with and failing that I can always buy a new pair :)
 
Top